Event-based push notifications are a great way to stay connected with your customers. In this post, I’ll show you how easy it is to integrate OneSignal and Segment to send notifications for events such as new user registration, abandoned cart email, and checkout completion. For this tutorial, I’ll focus on new user registration since it's an everyday use case. By the end of this post, you will understand how you can leverage Segment and OneSignal to execute event-based notifications in your apps.
This guide will build a simple onboarding experience that delivers a custom email once a user has successfully onboarded. We’ll leverage Segment’s track analytics to indicate when a user has achieved specific milestones and OneSignal’s segment syncing feature to ingest Segment event data. The integration will make analytic event data available to OneSignal via Data Tags, custom key-value pairs that empower you to deliver customized messages to your users.
To use this setup guide, you will need:
- A OneSignal account - Create a Free OneSignal Account
- A Segment account - Create a Free Segment Account
- A Mailgun account -You can also use Mailchimp or SendGrid; however, this guide uses Mailgun. Create a Free Mailgun Account
Step 1: Set Up Your OneSignal Account
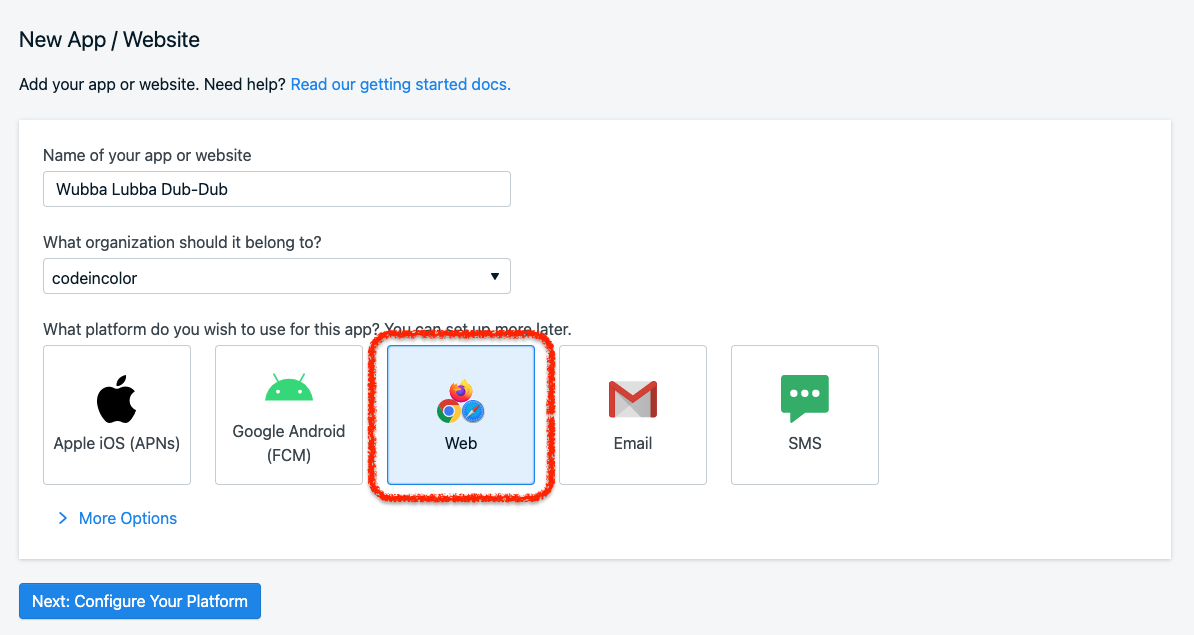
Let’s start by creating a new app in your OneSignal account.
Navigate to your OneSignal dashboard and click the New App/Website button.

On the New App/Website page, provide a name for your app and select Web as your platform. You can optionally assign your new app to an existing organization. Click the button labeled Next: Configure Your Platform.
On the Web Configuration page, select the Custom Code configuration option.

Provide a name for the site and the URL for your app. If you are developing your app locally, set the URL to localhost and specify the port your app listens to. Note that you’ll be presented with the option to treat traffic from your dev environment as HTTPS.
Click the Save button to complete the app setup process.
Step 2: Create a Segment Source
Now that you set up your application in OneSignal, you can move on to creating a Segment Source.
From the Home page of your Segment app, use the menu on the left to navigate to the Sources page. Click the Add Source button in the top right corner of this screen to create a new source.

Search for node in the sources catalog and select Node.js from the search results.

Click the Add Source button from the modal window. Clicking this button will take you to the Source setup page.

Provide a name for your source, then click the Add Source button to complete the source setup.

Once you’ve successfully added your source, you’ll be presented with the Overview for your newly created source. You will have access to the source’s Write Key, which we’ll use in the app.
Step 3: Integrate Segment with OneSignal

To complete the Segment integration with OneSignal, you need to add a Segment destination. You can accomplish this by navigating to the Destinations page in your Segment account and clicking the Add Destination button, but this setup option requires a couple of manual steps. To simplify this process, you can use OneSignal to automatically set up the destination in Segment.
To do so, navigate to your OneSignal app’s Settings, select the Analytics from the submenu, then click the Activate button within the Segment.com integration card. You may be asked to log in to your Segment account.

You will be prompted to select the Segment Workspace and Source for which you’d like to add a OneSignal destination. Once your selections have been made, click the Allow button.

Upon completion, you will have a new destination configured in Segment.

Step 4: Set up Email Delivery with OneSignal and Mailgun
Now that you’ve configured the Segment integration, you can add the final piece needed for this use-case: email delivery. This guide uses the OneSignal Mailgun integration to deliver email. Email setup is outside the scope of this guide; however, setup is a straightforward process, and you can find instructions on integrating with Mailgun in our Mailgun Setup Documentation.
Step 5: Set up Your Next.js App
With the “backend” integrations done, you can implement your core logic in the web app. I’m using Next.js due to the simplicity it provides when bootstrapping a new application. Keep in mind that while I’m using Next.js and React for this implementation, you can easily follow along using any web UI framework you like.
With that out of the way, start by creating a new Next.js app using Create Next App npx create-next-app.

Open the app directory in your editor of choice and add a file named .env.local so that you have a place to store the secret keys needed to interact with the Segment and OneSignal APIs.
Create the following variables inside .env.local and set them using the keys in your OneSignal and Segment apps:
SEGMENT_WRITE_KEY
This key can be found in the Source Overview section of your Segment dashboard.
NEXT_PUBLIC_ONESIGNAL_APP_ID
To locate your app ID, navigate to the All Applications page in your OneSignal dashboard and select the app you’d like to configure. On the app page, select Settings > Keys & IDs from the overhead menus. The app ID is located on this page in the OneSignal Keys section.
NEXT_PUBLIC_ONESIGNAL_API_KEY
This value is located right below your app ID on the same page.
Now you need to ensure you will have access to these variables in your app code. Create a file called common/constants.js and copy the following code:
export const SegmentWriteKey = process.env.SEGMENT_WRITE_KEY!;
export const OneSignalAppId = process.env.NEXT_PUBLIC_ONESIGNAL_APP_ID!;
export const OneSignalSecretKey = process.env.NEXT_PUBLIC_ONESIGNAL_API_KEY!;
Step 6: Integrate OneSignal with Your Next.js React App
Now you can move on to integrating OneSignal within the Next.js React app. Note that this implementation is specific to Next.js 11; if you’re using React, you may prefer to use hooks to accomplish the same outcome. If so, check out this guide on doing just that in a Next.js 10 app or any React app. The code for the hook can be found in the companion repo for that post. If you’re following along with this example using Next.js 11, copy the following code inside a file named components/OneSignal.tsx.
import Script from 'next/script'
import { OneSignalAppId } from '../common/constants'

const OneSignal = () => (
  <>
    <Script
      id="onesignal-sdk"
      src="https://cdn.onesignal.com/sdks/OneSignalSDK.js"
      onLoad={initOneSignal}
    />
  </>
)

const initOneSignal = () => {
  const onesignal = window.OneSignal
  if (!onesignal) {
    console.warn('OneSignal SDK not loaded.')
    return
  }
  onesignal.init({
    appId: OneSignalAppId,
    allowLocalhostAsSecureOrigin: true
  })
}

export default OneSignal
Next, download the OneSignal service workers and place the files in the public directory to complete the integration of OneSignal into your app.
Step 7: Create an Onboarding Workflow for Your App
Now you can start building the basic workflow to onboarding a new user to the app.
The first step in building out this workflow is to enable the user to sign up for our app. We’ll accomplish this by creating a component with a form that posts data to our backing API and logic to make a OneSignal Player.
Get started by wiping the content returned from the component named pages/index.tsx and replacing it with an empty one.
const Home: NextPage = () => <>Home</>;

export default Home;
Next.js provides a component that lets you control the content rendered in the page header called Next/Head, which you will use to give your page a name and set other meta information. You should render this first because it aligns with how a standard HTML page is constructed. Immediately after rendering your Head component, render the OneSignal component to leverage the OneSignal Web SDK on the page. For this tutorial, I've titled the page Wubba Lubba Dub-Dub and added the content The same stuff, just event based bruh — replace these elements with the title and content that makes the most sense for your use case.
const Home: NextPage = () => (
  <>
    <Head>
      <title>Wubba Lubba Dub-Dub!</title>
      <meta
        name="description"
        content="The same stuff, just event based bruh"
      />
      <link rel="icon" href="/favicon.ico" />
    </Head>
    <OneSignal />
  </>
)
You will now need to create a form so that you can collect user information. I’m using the popular OSS library, Formik, to build this form because it handles a lot of the complexity in building forms with React. Render the following TSX after the OneSignal component.
<div className={styles.container}>
  <main className={styles.main}>
    <h1 className={styles.title}>Welcome to Wubba Lubba Dub-Dub!</h1>
    <p className={styles.description}>
      Get started by singing up for my app!
    </p>
    <Formik initialValues={{ email: "" }} onSubmit={signup}>
      <Form>
        <label htmlFor="email">Email</label>
        <Field name="email" type="email" />
        <button type="submit">Sign up!</button>
      </Form>
    </Formik>
  </main>
</div>
Note that you pass a callback function named signup to Formik’s onSubmit prop. Create that function by pasting the following code before the TSX is returned.
const router = useRouter()

const signup = async (data: UserSignupInfo) => {
  const response = await fetch("api/signup", {
    method: "POST",
    headers: {
      "Content-Type": "application/json",
    },
    body: JSON.stringify(data),
  })
  const json = await response.json()
  const { id, error } = json
  if (error) {
    console.error(error)
    return
  }

  await window.OneSignal.setEmail(data.email)
  await window.OneSignal.setExternalUserId(id)

  router.push(`/onboard/${id}`)
}
The signup function kicks off the onboarding process. This onboarding process is achieved by making a call to an API endpoint with the path api/signup. If that call is successful, it will utilize the OneSignal Web SDK to set the user’s email address and associate that information with a OneSignal player record.
Now you can move on to create the backing API endpoint that will be responsible for sending a Segment Track analytic to your source. Next.js makes creating APIs simple: just create a file under the api directory that exports a function as the default. Name your file api/signup and paste the following code inside it:
import Segment from "analytics-node";
import type { NextApiRequest, NextApiResponse } from "next";
import { SegmentWriteKey } from "../../common/constants";
import { UserSignupInfo } from "../../common/types";
import {
  exists as userExists,
  insert as insertUser,
} from "../../common/utils/fake-user-store";

type SignupResponse = { userId: number } | { error: string };

const segment = new Segment(SegmentWriteKey);

export default function handler(
  req: NextApiRequest,
  res: NextApiResponse<SignupResponse>
) {
  const { email } = req.body as UserSignupInfo;
  if (!email) return res.status(422).json({ error: "Email is required." });
  if (userExists(email))
    return res
      .status(422)
      .json({ error: `User with email ${email} already exists.` });

  const userId = insertUser(email);
  segment.track(
    {
      userId: userId,
      event: "Signup",
      properties: {
        email,
      },
    },
    err => err && console.error(err)
  );

  return res.status(200).json({ userId });
}
Several things are going on in the snippet above, but I will focus only on the bit that sends the Track analytic to Segment. That line of code is crucial to enable an event-based notification scheme with OneSignal. It works by sending a custom event to Segment whose properties are forwarded to OneSignal. After sending data to Segment, you return the user ID to the client to use it as the external ID in the OneSignal app.
The previous snippets used a few helper functions and dependencies, so you can go ahead and add them to your project now. Start by installing the node packages for Segment and Formik by executing yarn add analytics-node formik. If you’d like to install the corresponding TypeScript types for the Segment package, run yarn add --dev @types/analytics-node. With the packages installed, you can implement the helper functions and types used in your newly created API route.
Let’s start with types. Create a file named common/types and paste the following code.
declare global {
  interface Window {
    OneSignal?: any;
  }
}

export interface User {
  id: number;
  email: string;
  name: string;
}

export type UserSignupInfo = Pick<User, "email">;

export type UserOnboardInfo = Pick<User, "id" | "name">;
Now add a file named common/utils/generate-uid.ts and paste the following code.
export default function generateId() {
  return Math.random() * (1000 - 1) + 1;
}
Finally, add a file named common/utils/fake-user-store.ts and paste the following code.
import { User, UserSignupInfo } from "../types";
import generateId from "./generate-uid";

const users = new Map<string, Partial<User>>();

export function exists(email: string) {
  return users.has(email);
}

export function insert(email: string, user: Partial<User> = {}) {
  const id = generateId();
  users.set(email, user);
  return id;
}

export function update(email: string, user: Partial<User>) {
  users.set(email, { ...user, email });
}
These three helper files will allow us to emulate a database in our application and are only required for demonstration purposes. In a production environment, you would use the persistence technology you typically use; the key is to return the primary key used in the database.
Now that you’ve completed signup functionality, you can move on to the second step in your new user workflow: onboarding. For this tutorial, our onboarding process will be super simple and only ask the user for their name.
Start by creating the page the Home page navigates the user to upon successful signup. Create a file named pages/onboard/[uid].tsx. If you read the signup callback code in pages/index.tsx, you probably noticed that we passed the user ID returned from the signup API route in the URL path.
router.push("/onboard/${id}");
The Next.js router will capture the value passed in the URL path and make it accessible via a property named uid on the router’s query object. This behavior is due to how the Next handles components with square brackets [ ] in the name. Paste the following code into pages/onboard/[uid].tsx.
const Welcome: NextPage = () => {
const router = useRouter();
const { uid } = router.query;
const id = typeof uid === "string" ? parseInt(uid, 10) : -1;
const completeOnboarding = async (data: UserOnboardInfo) => {
await fetch("http://localhost:3000/api/onboard", {
method: "POST",
headers: {
"Content-Type": "application/json",
},
body: JSON.stringify(data),
});
router.push("/welcome");
};
if (id <= 0) {
return <div>Oops</div>;
}
return (
<div className={styles.container}>
<Head>
<title>Wubba Lubba Dub-Dub!</title>
<meta
name="description"
content="The same stuff, just event based bruh"
/>
<link rel="icon" href="/favicon.ico" />
</Head>
<main className={styles.main}>
<h1 className={styles.title}>Wubba Lubba Dub-Dub!</h1>
<p className={styles.description}>Let's get onboarded!</p>
<Formik initialValues={{ name: "", id }} onSubmit={completeOnboarding}>
<Form>
<label htmlFor="name">Name</label>
<Field name="name" type="text" />
<button type="submit">Take me to the thing!</button>
</Form>
</Formik>
</main>
</div>
);
};
export default Welcome;
In the code snippet above, we're using a form to collect additional user information needed to complete our example use-case on this page. We’re using the router to parse the user ID from the URL path (remember, we navigate the user from the signup page to this page using router.push("/onboard/${id}"); . The value stored in id is captured inside the router’s variable named uid. This ID is posted to the API with the form data, so we can look up the user to update their record in our data store. In the above code, you'll notice that my title, content, and button type are all specific to my example. Make sure to customize these elements to fit your idea use case.
The backing route in your API is very similar to your signup API route. The code is below.
import Segment from "analytics-node";
import type { NextApiRequest, NextApiResponse } from "next";
import { SegmentWriteKey } from "../../common/constants";
import { UserOnboardInfo } from "../../common/types";

const segment = new Segment(SegmentWriteKey);

export default function handler(req: NextApiRequest, res: NextApiResponse) {
  const { id, name } = req.body as UserOnboardInfo;
  segment.track(
    {
      userId: id,
      event: "Onboarded",
      properties: {
        name,
        onboarding_step: "complete",
      },
    },
    err => err && console.error(err)
  );

  return res.status(200);
}
I’m only sending a track analytic to the Segment source. This is the power of using Segment: I can get data into OneSignal simply by sending an event! The rest of the setup involves configuring the Segment side to form audiences based on event data and the OneSignal side to automate sending a message based on a user moving into a specific segment. In your example, you can segment your users based on the value of the onboarding_step property sent in the track analytic.
Creating a New Audience in Segment
To start you'll need to create an audience in Segment. Navigate to Personas from the side navigation menu, and select Settings. We’ll add the Segment source we created earlier as a source to feed data into our Personas. Select Sources and click the Connect Sources button.

Select the source from the list presented in the Connect Sources modal window and click the Connect Sources button. In my example, the source name is Wubba Lubba Dub-Dub.

Now you need to set up a destination for audiences to sync to. This setup process is identical to the one taken to create your initial OneSignal destination. You’ll even use the same credentials you used to set up the original source.
To get started, click the Add Destination button and go through the steps to add the destination. As you can see, I named the destination OneSignal Audiences to make it easier to distinguish between the destination for events and personas.

Now you’re ready to create your audience! Select Audiences from the secondary navigation menu at the top of the page, then click the New button and select Audience from the drop-down menu.

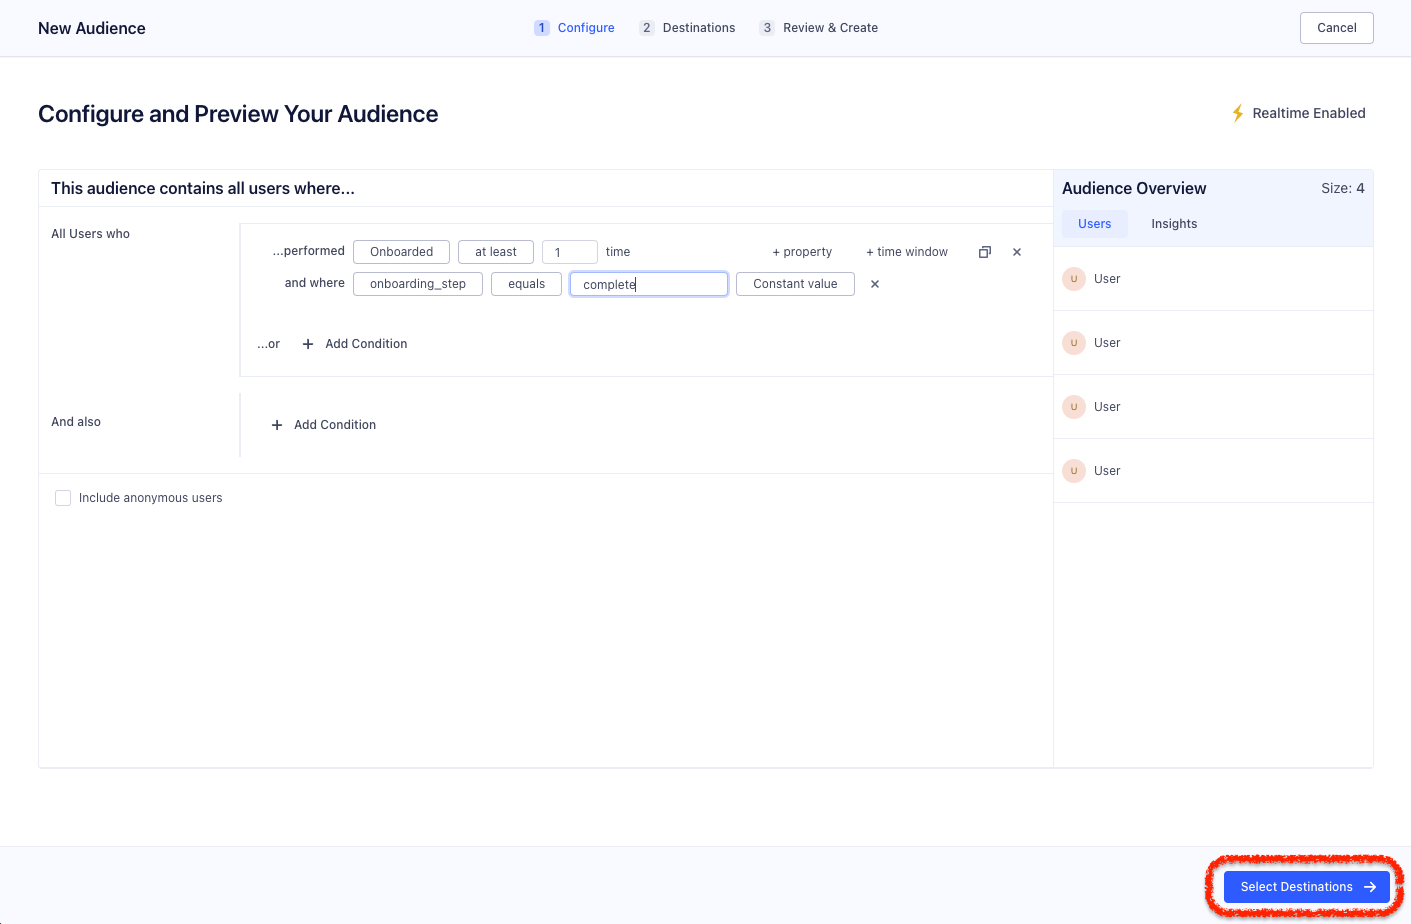
You’ll be taken to the New Audience page where you’ll be able to configure which users are assigned to your audience. For this example, you'll want to create an audience of users who have completed onboarding. Remember that you’re sending a track analytic with an Onboarded event which includes a property named onboarding_step — you will use those attributes to build your audience.
Click the Add Condition button and select the Performed an Event option.

Select the Onboardered event and click + property to add a condition for the onboarding_step property that is equal to “complete.” Remember that this is the value you pass in the source code to indicate that a user has completed user onboarding.

Once you’ve completed configuring your audience, you can preview the users who qualify for this audience by clicking the Preview Results button. It will take a moment to compute which users belong in this audience. When you’re presented with an Audience Overview, click the Select Destination button to set up a destination to sync audience segments with. Now, when Segment places a user into an audience, OneSignal will place that user in a Segment.
Building an Automated Onboarding Message in OneSignal
Now you can move on to create your automated onboarding message that will be triggered when a user is added to into a segment. Navigate to the OneSignal dashboard and select the correct app. From this app page, click Messages in the top menu. We will be sending email in our example, so we must create an email template first. Click the Templates submenu item so we can create our first email template.

Once the Message Templates page loads, click the New Email Template button and name the template Onboarding Complete.
Set the email template’s first text block to use conditional personalization rules. For this example, I've used the name personalization token and used "human" as the default value (seen below). You can customize these elements to better fit your brand style and tone.
Hi {{ name | default: 'human' }}
Note that our template syntax enables you to customize the message based on data submitted to OneSignal. In our case, we can use the properties sent along in the track analytic to control what message gets sent to the user. This behavior is enabled by the OneSignal integration making properties sent in a Segment analytic available as data attributes. These data attributes are key to customizing our messaging with user-specific data.
In the message field, insert the message text for this automated message. For this tutorial, I set my message text to you're signed up for the thing.
Click the Save button to complete the template.

Next, click Automated in the submenu.
Click the New Automated Message button and select New Automated Email from the drop-down menu.

Name the new automated message User Onboard or another name that indicates the goal of this automated message to make it easier to identify later.
In the Audience section, select the Send to particular segment(s) option.
When asked who should receive the campaign, remove the default Subscribed Users segment.

Click the Include Segment button to open the Segment Editor modal. Select the (Segment) Onboarded Users option that was synced from Segment.com.

Once the proper audience/segment is selected from Segment.com, you can move on to filling out the email subject and selecting the email template you created in the previous step. Once the required information has been inputted, you can activate the automated message by clicking the Make Active button. You can also specify when a user should receive the message. For this tutorial, I've chosen to leave the two checkboxes under the header Deliver to users more than once? blank.

Once all required info has been entered, click Make Active to create the automated message. Now the only thing left to do is check out work. Navigate to the web app running on your localhost and go through the “onboarding process.”
For more information on how to send event-based notifications, check out our OneSignal + Segment + Next.js web sample in Github or reach out to us at support@onesignal.com with questions.
Join our Developer Community