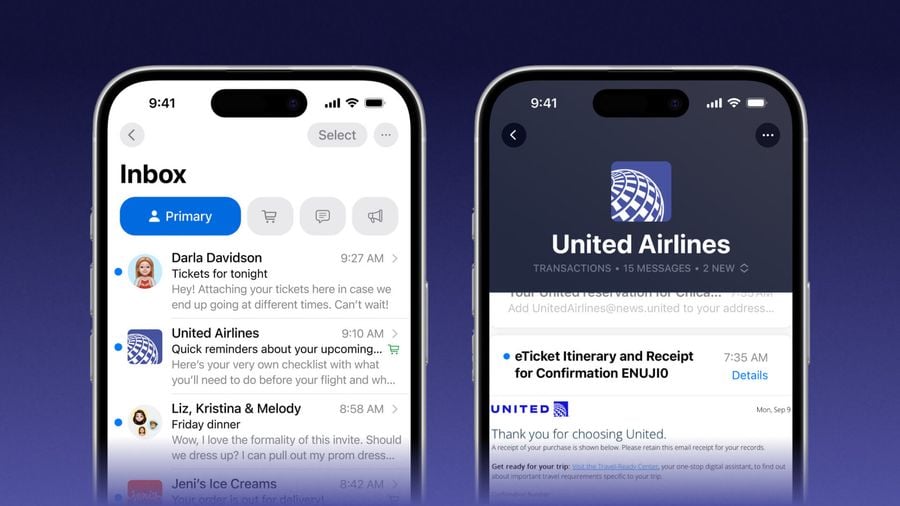
As email continues to be one of the most effective communication channels in digital marketing, standing out in crowded inboxes becomes more crucial. But with the over-saturation of branded marketing emails being sent every day, this isn’t always an easy task. For mobile marketers, Apple’s new Business Connect offers a fresh way to ensure brand visibility and trust. Recently, Apple rolled out Branded Mail, a useful feature within Business Connect that lets marketers enhance brand recognition directly in customers’ inboxes.
In this guide, we’ll break down what Apple Business Connect and Branded Mail are, why they matter for mobile marketers, and how to get started with email setup. Whether you’re looking to drive more engagement or improve your brand’s credibility, this step-by-step approach will make implementing Branded Mail straightforward and accessible.
What is Apple Business Connect?
Apple Business Connect is a platform from Apple designed to help businesses optimize their presence across Apple’s ecosystem, including Maps, Siri, Messages, and, now, Mail. Initially introduced to improve the business experience within Apple Maps, Business Connect offers tools for business listings, user engagement, and now, email branding.
In theory, Apple Business Connect offers mobile marketers greater control over how their brand appears and interacts with customers on Apple devices. With the Branded Mail feature specifically, you can create a custom branded email experience for your customers, improving recognition and trust every time an email is opened.
Why Branded Mail is Important for Mobile Marketers
Back to the current mobile marketing conundrum at hand: your users’ inboxes are packed with promotional messages, and ensuring your emails are recognizable remains key to sustaining engagement. Apple’s Branded Mail allows you to include branded elements like logos and sender details that help establish credibility and ensure recipients recognize your brand before even opening the email.
If this sounds familiar to you, it’s because Apple’s Branded Mail follows a similar approach to BIMI (Brand Indicators for Message Identification), a standard that allows verified brands to display their logos alongside emails to build trust and visibility. Just like BIMI, Apple’s Branded Mail aims to reduce phishing risks and boost open rates by assuring recipients that emails are genuinely from your brand.
This guide on How to Boost Brand Visibility With BIMI goes into more detail, should you need to catch up.
Setting Up Apple Business Connect Branded Mail
Setting up Branded Mail is designed to be as seamless as possible, and Apple provides marketers with a step-by-step approach to implement it successfully. Here’s a breakdown of the essential steps to get your Branded Mail up and running:
Step 1: Access Apple Business Connect
If you haven’t already registered your business on Apple Business Connect, start there. Visit the Apple Business Connect website, sign up, and complete the necessary details to verify your business. The platform will guide you through steps to verify your business and connect it to relevant Apple services, including Branded Mail.
Tip: Make sure to gather all relevant business information before beginning the registration process. This includes your business name, address, logo, and any verification documents Apple may require.
Step 2: Enable Branded Mail in Your Apple Business Connect Account
Once your business is set up in Apple Business Connect, navigate to the Mail section in the dashboard to access Branded Mail settings. Here, you’ll see options to begin the setup process specifically for your email branding.
Apple requires that all brand assets—such as logos and sender information—go through an approval process to maintain quality and security standards. For email branding, Apple will review your logo to ensure it meets visibility and design guidelines for a clean, professional appearance in Apple Mail. It’s a good idea to prepare high-resolution logo files in a standard format, such as PNG, and ensure your branding aligns with Apple’s aesthetic preferences for a smoother approval process.
Step 3: Verify Your Domain
Domain verification is an essential security step. To verify your domain, follow these steps:
- Access Domain Settings: In the Branded Mail section, locate the domain verification option. You’ll need administrative access to your domain settings.
- Add a TXT Record: Apple will generate a unique TXT record, which you’ll need to add to your domain’s DNS settings. This confirms to Apple that your business owns the domain and has permission to send branded emails from it.
- Verify the Domain: Once the TXT record is added, return to Apple Business Connect and click Verify. It may take up to 48 hours for Apple to process the verification, so make sure to allow time for this step.
Apple’s approval process for Branded Mail assets can take up to 7 business days for logos, so plan your campaigns accordingly. Additionally, once the TXT record is added for domain verification, Apple requires it to be verified within 14 days to avoid reconfiguration. Set up the logo and domain verification process early and factor these timelines into your campaign schedules, especially if you’re planning for seasonal promotions or time-sensitive campaigns.
If you’re unfamiliar with domain settings, consult your website administrator or hosting provider for help. Incorrectly configured DNS records can delay verification.
To use Branded Mail, your email servers must comply with DMARC (Domain-based Message Authentication, Reporting & Conformance) and be authenticated using DKIM (DomainKeys Identified Mail). If your servers only use SPF (Sender Policy Framework) authentication, you’ll need to upgrade to ensure compatibility. Work with your IT or email team to review your email server’s authentication settings and make adjustments. Complying with DMARC helps protect your domain from unauthorized use, improving email security and brand trustworthiness.
If you have more questions about email authentication, this guide to How and Why to Set Up DMARC for Your Email Marketing has answers!
Step 4: Configure Email Templates for Branded Mail
After verifying your domain, you’re ready to create branded email templates that incorporate your brand’s design elements. Apple’s Branded Mail provides options to customize the appearance of emails with your logo, colors, and other brand-specific details.
When designing your template, choose visual elements that align with your brand, including clear logo placement, readable color themes, and any custom links. Use the preview function to see how your emails will look across different Apple devices. Testing ensures that recipients see the design as intended, helping you catch any potential display issues.
Once you’re satisfied with the email design, save the template. You can now use this template for future email communications, which will automatically feature the branded look.
Tip: To ensure consistency, work with your design team to match your email template with your other branded assets, such as your website and app interface.
Apple gives you flexibility with domain configurations, allowing you to verify either a full domain, a specific subdomain (e.g., emails.yourbrand.com), or particular email addresses. If you want to restrict Branded Mail to specific campaigns or email lists, consider using subdomains to keep communications separate. This allows more control over branded emails and also helps segment various types of emails you may send (such as promotions vs. transactional emails).
Step 5: Launch Your Branded Mail Campaign
Once you’ve finalized your branded email template, it’s time to incorporate it into your email marketing campaigns. Use your email service provider (ESP) to send emails using the branded domain and Apple-verified template.
Most ESPs provide email analytics, so track your campaign’s open rates, click-through rates, and other priority metrics. These insights will help you understand how Branded Mail affects your audience’s responsiveness and engagement.
Use these best practices for optimizing Branded Mail performance:
- Ensure your email content is informative and valuable to your recipients, reinforcing your brand’s reputation as a trusted source of information.
- Apple users appreciate clean and minimalist email designs, so keep your branded emails uncluttered and visually appealing.
- Apple users can report spam or unsubscribe easily, so ensure that you’re only sending emails to recipients who have opted in and that you maintain a consistent sending schedule.
Maximizing Branded Email With OneSignal
Apple Business Connect Branded Mail offers mobile marketers a unique opportunity to boost their brand visibility in Apple users’ inboxes with a polished, professional email experience. As Apple continues to innovate, mobile marketers should seize these tools, along with the right omnichannel engagement solution.
With advanced personalization, email segmentation, and automation capabilities, OneSignal ensures your branded emails are targeted and timely, maximizing open rates and engagement. By combining OneSignal’s robust email tools with Apple’s Branded Mail, you build trust, drive loyalty, and deliver a consistent brand experience in each and every inbox.
Get Started for Free


