When asking for push notification permission, a pre-permission, or “soft” prompt is an invaluable asset. Pre-permission prompts appear before the native iOS prompt and provide users with the context they need to make an informed opt-in decision. Learning how to create compelling permission prompts for iOS will improve your push notification opt-in rates and result in a more seamless user experience.
Step 1: Build Your In-App Message
You can only serve up Apple’s native permission prompt once, so creating an in-app permission prompt will help you prime users to accept the native permission and allow you to hone the timing of your request. To begin, you’ll need to create a new in-app message:
- Navigate to the Messages tab in your OneSignal portal and select In-App from the messages menu bar. Click New In-App.
- Name your message to improve organization and make it easier to identify in your OneSignal message portal.
Message Name*
Mobile Push Pre-Permission Prompt (iOS)
Step 2: Define Your Message Audience
- Under the 1. Audience section in the message builder, select Show to Particular Segment(s).
- Deselect the default Subscribed Users segment by clicking on the X. Once this segment has been removed, click the Add Segment button to create a new audience segment.
- A pop-up window will appear showing default audience options and any custom segments you’ve previously created. Rather than choosing a premade option, click the Create Segment button at the bottom right corner of the window to build your segment from scratch.
- Rename your new segment to make it easier to identify in the future.
Name of segment*
iOS Push Permission Audience
- Click the Add Filter button. Scroll down in the pop-up window and click on Device Type from the filter options. In the form fields that appear, select iOS as the device type from the drop-down menu.
Device type is iOS
- Click Add filter if you’d like to add other audience filters such as session count. Selecting this option will create an and filter — in order to qualify for this list, a user must meet both/all the criteria (as opposed to one or the other).
- Under filters, select Session Count and use the drop-down menu to select greater than and type 1 into the adjacent field. This filter will prevent users from receiving the iOS pre-permission prompt the first time they enter your app.
Session count greater than 1 session.
- Click Create Segment to save this new segment. Doing so will bring you back to the in-app message screen. You should see your new segment highlighted under show to segments.
Although your audience is now segmented to include iOS users with more than one app session, it will not automatically exclude iOS users that have previously granted push permission. You will need to fine-tune your qualification criteria further by creating a custom data tag and trigger in Step 4. Custom triggers can also be used to hone your message timing and targeting abilities.
Step 3: Craft Your Message Content
The design, wording, and format of your message can have a significant impact on whether or not a user chooses to allow push notifications. Be specific about what type of notifications you’d like to send, what value they can provide, and what action you’d like users to take. You may want to include an image of a push notification you’d like to send to help demonstrate the value of this channel and establish expectations for this messaging relationship. For tips to write more compelling opt-in messages, check out this article. To create your message, follow these steps:
Under the 2. Message section of your in-app message builder:
- Enter an image of an example notification under the Image 1 tab.
- Enter your message headline text in the Text 1 field.
Text 1:
Get Local Weather Alerts
- Enter your message body text in the Text 2 field.
Text 2:
Allow notification to receive real-time storm warnings in your area and helpful tips to prepare.
Step 4: Create Custom Call-To-Action (CTA) Buttons
Pre-push permission prompts should give users two options:
1) to allow push notifications.
2) to delay the permission decision.
To improve opt-in rates and create a more seamless user experience, the opt-in CTA buttons should be configured to trigger the appropriate next step. In the case of a pre-permission prompt, an affirmative button click should trigger the native iOS permission prompt to appear.
To set up custom CTA buttons:
- In the Button 1 window (under the 2. Message section), enter the copy for your first button in the Button Text field. Your first button should always showcase your preferred action (i.e. the action you’d like users to take). You can adjust the color, size, and alignment of your button to better fit your app aesthetic in the button window.
Button Text
Allow Notifications
- In the same window, click Add Click Action and select Push Permission Prompt (iOS). Doing so will create an automatic trigger, thereby linking this button to Apple’s native permission prompt.
- To add a second button, click Add Block and select Button from the drop-down menu. This will create an additional Button 2 window. Enter the copy for your second button option in the Button Text field of this window. Unlike the native iOS prompt, your button copy should seek to delay the opt-in decision and leave the door open to revisit this decision in future.
Button Text
Maybe Later
- Do not add an action to this button. Instead, check to ensure that Dismiss on click is checked in this button window.
Step 5: Build Data Tags & Triggers to Hone Your Timing
How do triggers and data tags work together?
In-app message triggers are handled by our SDK. Triggers rely on data tags: a key:value pair of string or integer data that you must add to your app code to identify a specific user event or value. In other words, data tags allow you to extract specific and valuable data from your app that you can then use to filter your audience and automatically tigger messaging campaigns.
Create the iOS permission prompt data tag:
To delay the iOS opt-in decision until an optimal point in the user journey (and create a more seamless experience), you’ll first need to create a data tag that identifies users that have already viewed the iOS native permission prompt.
The key for this tag will be: prompt_iOS. The value of this tag will be true if a user has already viewed the native permission prompt. If you’re not a developer, ask a developer on your team to assist with this step using the instructions below. If you need to, scroll down to the bottom of the page and click Save as Draft to save your current progress and return once the data tag has been implemented.
Tag Implementation Instructions:
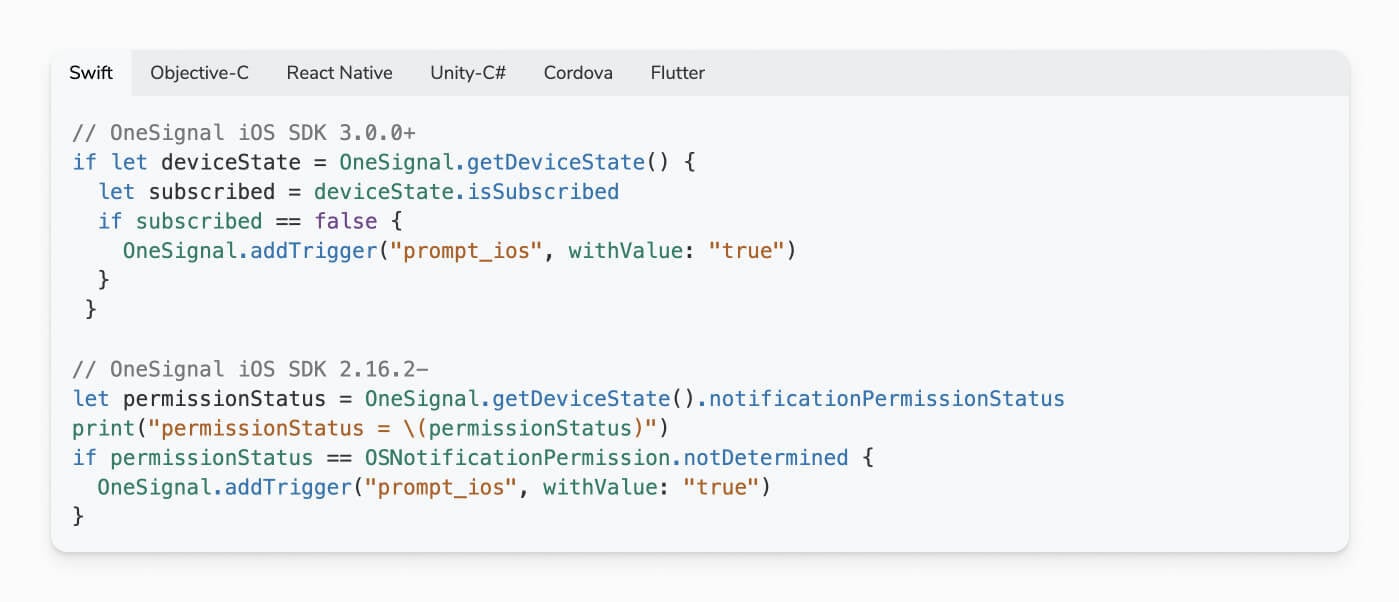
Use the permission status parameter from getDeviceState to detect if an iOS device is subscribed or not. If the device is not subscribed, use the addTrigger method to display the in-app pre-permission prompt to unsubscribed iOS users.
We’ve already created the code required to implement this tag. Simply select your programming language from the menu to view the appropriate code.
When creating your own data tags, make sure to follow our Data Formatting Rules to ensure seamless implementation.
Step 6: Automate Your Permission Strategy
Before you push your message live, you should confirm that your iOS Data Tag was applied successfully and review your message scheduling parameters.
In the message builder, under the 4. Schedule section:
- Select Immediately and Show forever to ensure that your pre-permission prompt is served up to all future iOS users.
- Click > Advanced Settings to display additional scheduling options. Select Show until dismissed and Only once from the options. Although you may wish to ask for push permission more than once, your second permission request will be more compelling if you create a second permission message and create unique behavioral triggers for this group.