Want to know the specific people who clicked on a notification? Now you can. We recently shipped a new feature called the Notification History API that allows you to do just that.
Knowing who clicked a specific notification is powerful because it lets you retarget users better based on the type of notification they engaged with. You can use this data to reduce badly targeted pushes, boost engagement, and have a happier user base.
The retargeting process is even easier when combining the Notification History API with another new OneSignal feature: the Segment Creation API. You can pull notification history data across several pushes and then develop user segments that engage well with specific push types. You can then create automated jobs to do this repeatedly over time in order to hone your segments.
In this blog post, we will explore one of the ways to do this step by step. You can then use this as a model for automating your segmentation process.
Overview
- First, we have to collect past notification data to learn which users engage highly with certain notifications types
- Next, we filter these users based on a minimum click count out of the total number sent
- Then, we create a unique tag to identify a new segment and use the list upload feature to update each player record
- Finally, we create a new segment of users with the tag
Pull Notification History
Use the Notification History endpoint to pull data for a notification of interest.
curl -X POST \
  https://app.onesignal.com/api/v1/notifications/{notification_id}/history \
  -H 'Authorization: Basic YOUR_REST_API_KEY' \
  -H 'Content-Type: application/json' \
  -d '{
    "events": "clicked",
    "app_id": "YOUR_ONESIGNAL_APP_ID",
    "email": "your_email@email.com"
}'
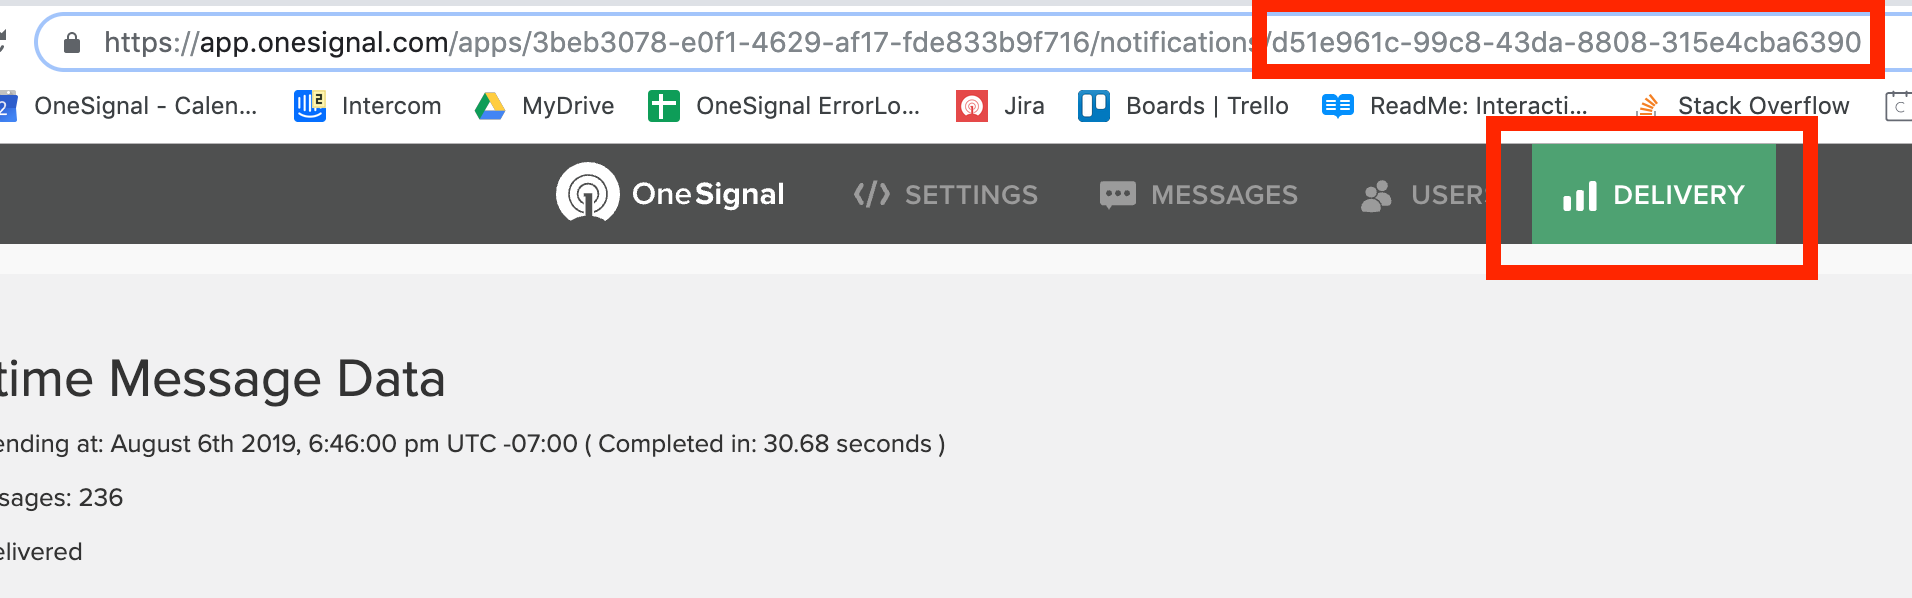
You can find a notification's id by looking at the URL when you view a notification in the "Delivery" tab of the dashboard:
Once you make the REST call, you will receive an email with the CSV download link. It can also be found in the response body of the successful HTTP post request.
{
    "success": true,
    "destination_url": "https://onesignal.s3.amazonaws.com/conversion_exports/YOUR_ONESIGNAL_APP_ID/NOTIFICATION_ID-ff47-444f-914d-db7b9a38je73_report.csv"
}
Go ahead and download/save the file. We will rename the file notif1.csv. It will look something like this:
| player_id | timestamp |
| 61cb20be-9bc6-4f77-9cc4-8c6f6b99ceaf | 1564692756 |
| 7611606d-1282-48ba-88a5-1a49e58f956b | 1564694727 |
We then repeat the above process for several notifications of interest, generating files like so: notif2.csv, notif3.csv, etc...
A good example would be pulling thirty notifications regarding Texas Aggie football. We want to generate a segment of users who love this type of notification so much, that they engage highly with it compared to other users who may engage more with basketball notifications, for example.
Create Segments Based on Engagement Data
Now that we have our notification data, we're ready to generate a more honed segment of users we know love receiving these notifications.
Here's a C++ program that will search through each notification file and generate a new file out.csv with a list of player ids who clicked on n or more of the notifications. Compile and run the program (note this was compiled on a Mac):
rodrigo@MacBook:~$ g++ onesignal_script.cpp -o onesignal_script
rodrigo@MacBook:~$ ./onesignal_script
Input number of notification files: 30
Input minimum number of opens: 5
Calculating...
Done. There are 5147 players in the set
In this example, we're filtering for player ids that clicked on at least 5 out of the 30 notifications in the set, or >= 16.6%. The more notifications in the set, the more accurate your new segment. For "minimum number of opens," pick a value that makes sense for you. If you don't know a good number, play around with the value until you get a meaningful number of players for a new segment.
Open up your output file and follow the instructions for updating player records through our List Upload feature. Here, you want to add a unique tag that will allow you to create a segment of users with that tag. Your file should look like this:
| player_id | texas_am |
| 61cb20be-9bc6-4f77-9cc4-8c6f6b99ceaf | 1 |
| 7611606d-1282-48ba-88a5-1a49e58f956b | 1 |
Upload the file through the dashboard to update the players with the tag and value. Note that the value of "1" here is arbitrary.
Next we want to create a new segment with these players. For this, we can use the dashboard or the new Segment Creation API:
curl -X POST \
  https://onesignal.com/api/v1/apps/{app_id}/segments \
  -H 'Authorization: Basic YOUR_API_KEY' \
  -H 'Content-Type: application/json' \
  -d '{"name": "Texas A&M High Engagement", "filters": [{"field": "tag", "key": "texas_am", "relation": "=", "value": "1"}]}'
{
    "success": true,
    "id": "4e49f3jf-b59e-4e72-9bd6-de11b103b2a9"
}
Voila. A new segment of highly engaged users.
An Alternative Approach (Non-technical)
An alternative approach to the above is using any past engagement history to form a new segment. In other words, instead of using a threshold of minimum opens, you are including users who have opened any notification at all (of a certain type). This approach doesn't optimize targeting your most engaged users, but rather any user who has opened a notification in the past.
To do this do the following:
- Pull the notification history as demonstrated above
- Remove the timestamp column from the CSV
- Follow the instructions for creating (or updating) a segment through our List Upload feature