It’s no secret that push notifications can help you engage and retain app users. In this tutorial, we'll show you how to use the OneSignal REST API using the Postman Visualizer.
The OneSignal REST API can help you integrate OneSignal into different workflows that your applications may have.
This tutorial will cover an overview of our OneSignal REST API reference and the usage of our OneSignal Postman collection with the superpower of the Postman Visualizer to build a custom OneSignal dashboard.
Guide Overview
- Part 1: OneSignal REST API Overview
- REST API reference
- Part 2: OneSignal Postman Collection
- Send Push Notifications
- Part 3: OneSignal Dashboard with Postman Visualizer
- Building the dashboard
This tutorial requires the following:
- A OneSignal account
- App with OneSignal integrated (mobile, web, or game)
Part 1: OneSignal REST API Overview
Sending Notifications
The OneSignal Push API allows you to programmatically send push notifications. The push notifications can be sent to different segments (by default you send them to all Subscribed Users) and even specific devices using the User ID. Another cool feature of the OneSignal REST API is the ability to cancel notifications that have been scheduled.
View Notifications
One of my favorite endpoints to use with the OneSignal REST API is the view notifications endpoint. This endpoint allows you to gather information about the notifications and outcomes associated with them. For example, the returned data can tell you see the number of notifications that have not been sent out, the number of notifications that got delivered, the number of confirmed deliveries, and much more information. If you want to learn more about all the data returned by this endpoint visit our rest API reference.
Method: GET
Endpoint: https://onesignal.com/api/v1/notifications
Our API can do way more than just send a notification and view data from that notification. If you want to learn more about our whole REST API, visit the OneSignal REST API overview page.
Part 2: OneSignal Postman Collection
Navigate to the OneSignal Postman Collection and fork this collection to have an exact copy of the OneSignal Postman collection as your playground.

Enter the fork label you want and select the location of your forked collection. In my case, I chose New Personal Workspace and click on the orange button Fork Collection.

Once you have done that, inside your Postman collection, on the left side menu, click on Environments then click on Create New Environment.

Rename the New Environment and give it the name you wish. I named my environment OneSignal.
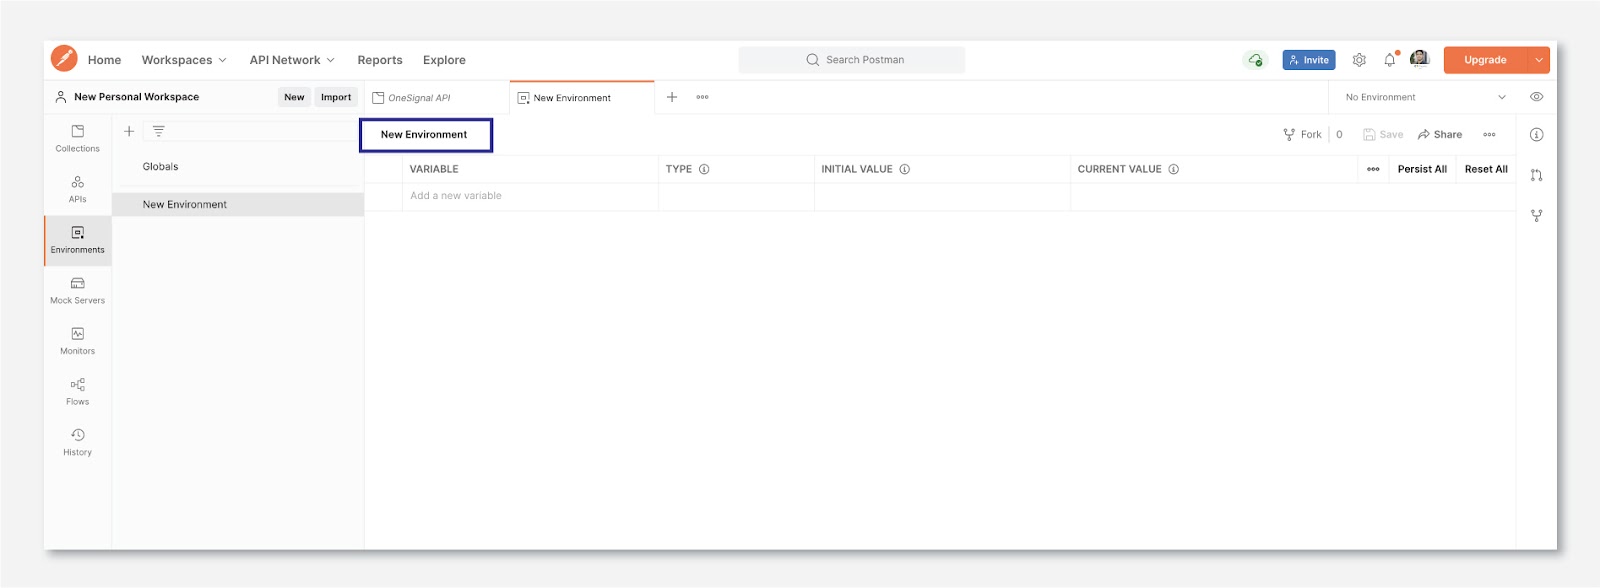
Once you have your environment created, you need to set that environment as active in your Postman Collection.

Now that you have this environment active, it's time to enter the environment variables. For this tutorial, you will only need three of them:

Now, how do you get the API Key, and the App ID from OneSignal? Navigate to the OneSignal Dashboard, and navigate to the app you created inside of OneSignal. Once you have selected the app you want to work with during this how-to guide, the dashboard page will open up.
Navigate to the settings page, by clicking the Settings tab.

Inside of Settings, click on Keys & IDs. On this page, you will see your OneSignal App ID and your API key.

Now that you are in the Settings/Keys & IDs tabs, you can copy the OneSignal App ID and the REST API KEY.
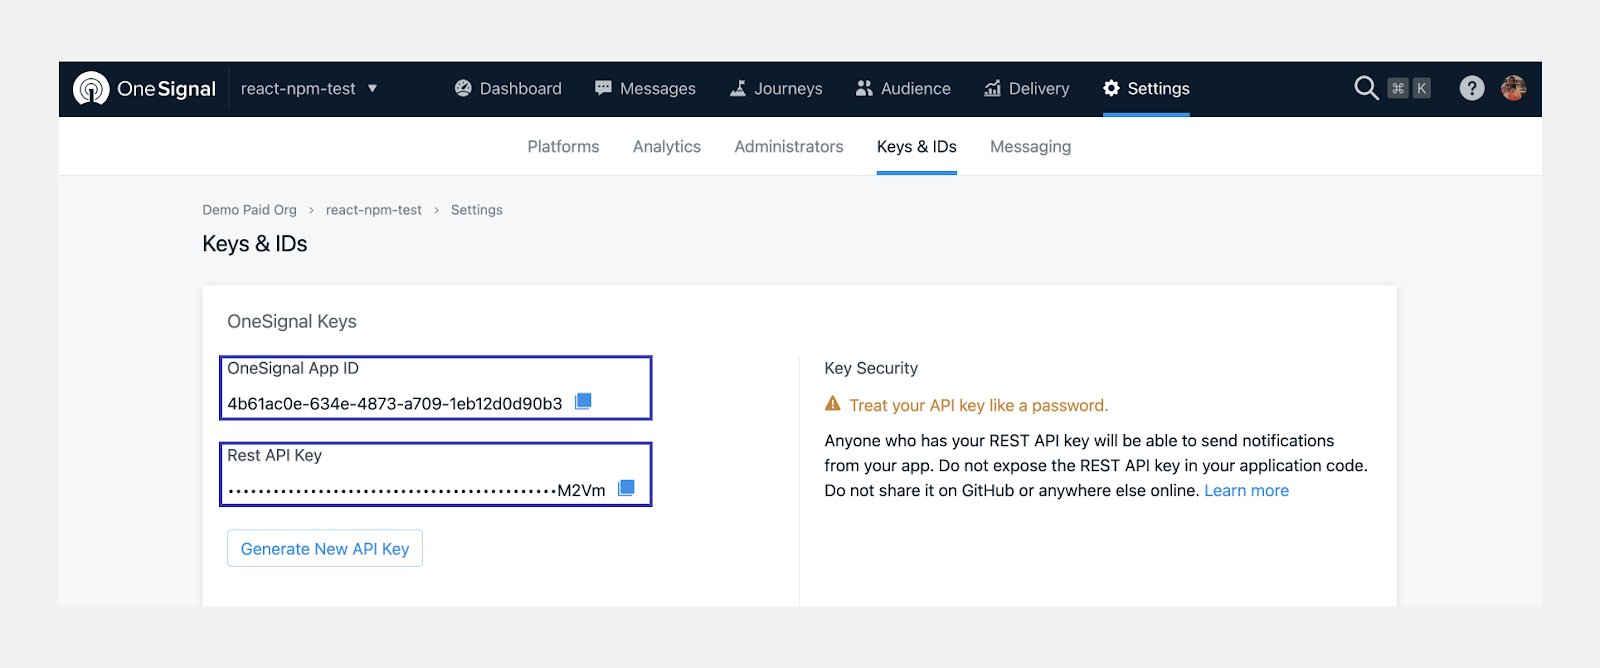
Note: Another quick way to access the OneSignal App ID is by copying it from the URL.

Don’t forget to Save your environment variables by clicking Save.
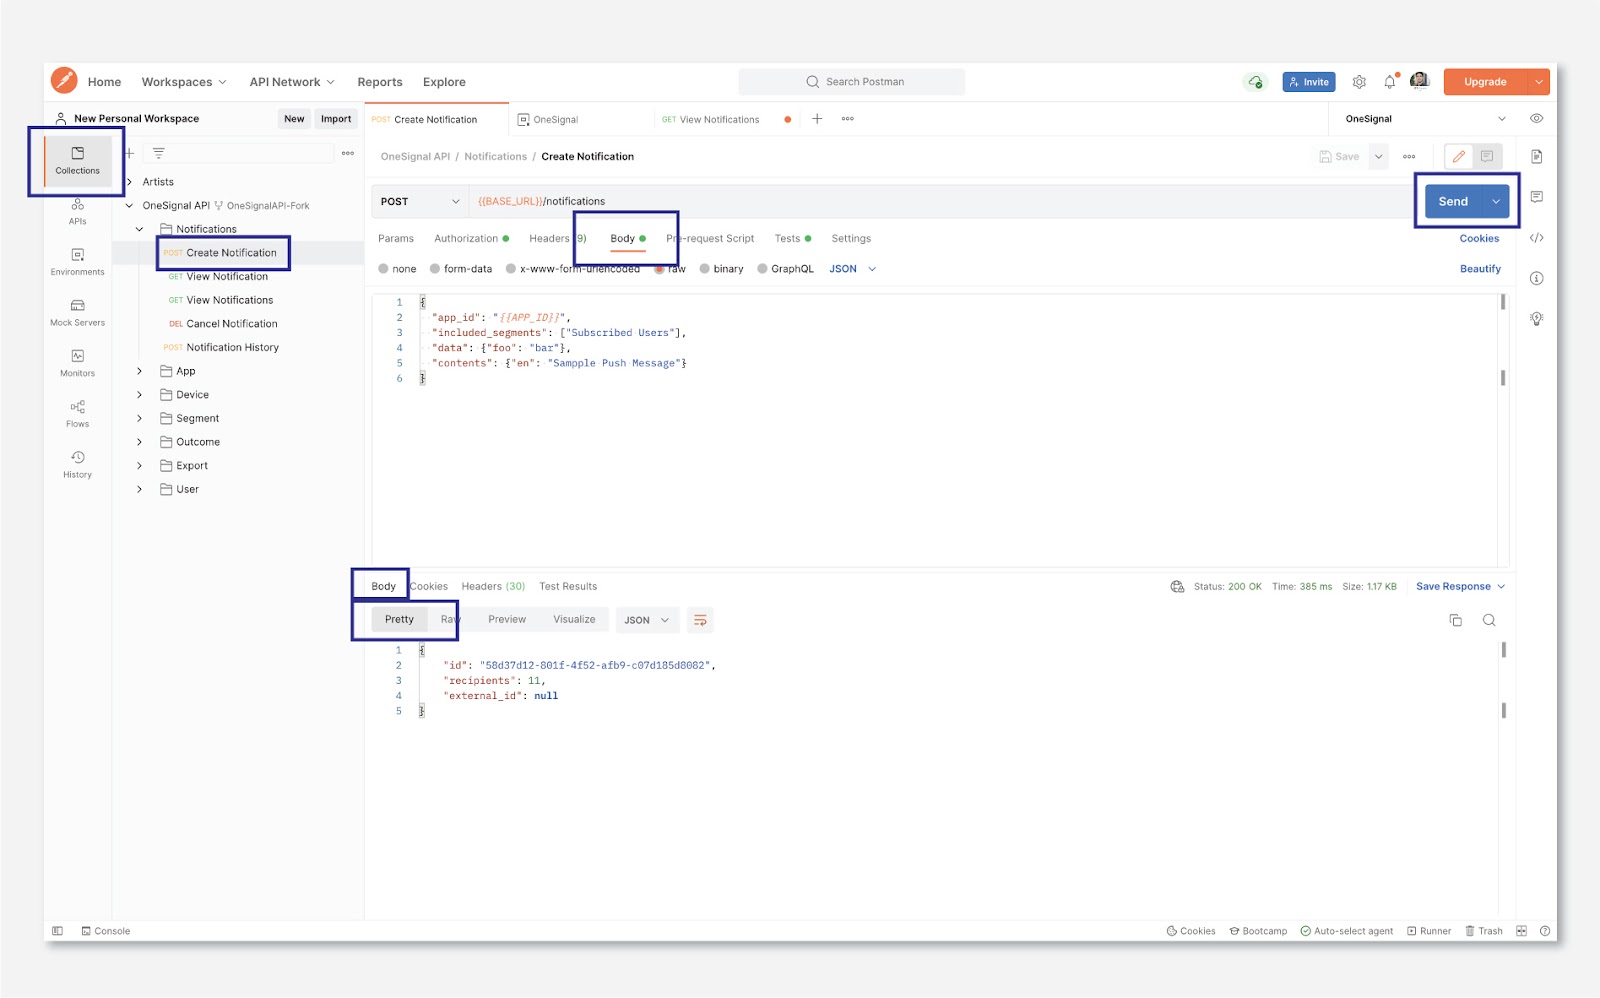
Create Notification
Create a push notification and send it to the users of your app.
Method: POST
Endpoint: https://onesignal.com/api/v1/notifications
@param {object} body
@returns {object} response
To send a notification, click on Collections on the left side of the menu then expand the dropdown OneSignal->Create Notification. Once you are inside of the Create Notification request, click on Body and modify the properties of the body of the request or leave the default ones. The body parameter represents the information the push notification will contain.
Now click on the blue Send blue button to send the request. At the bottom of this request, you will see a tab that says Body. This tab will have the response you got back from making the request to the OneSignal API.
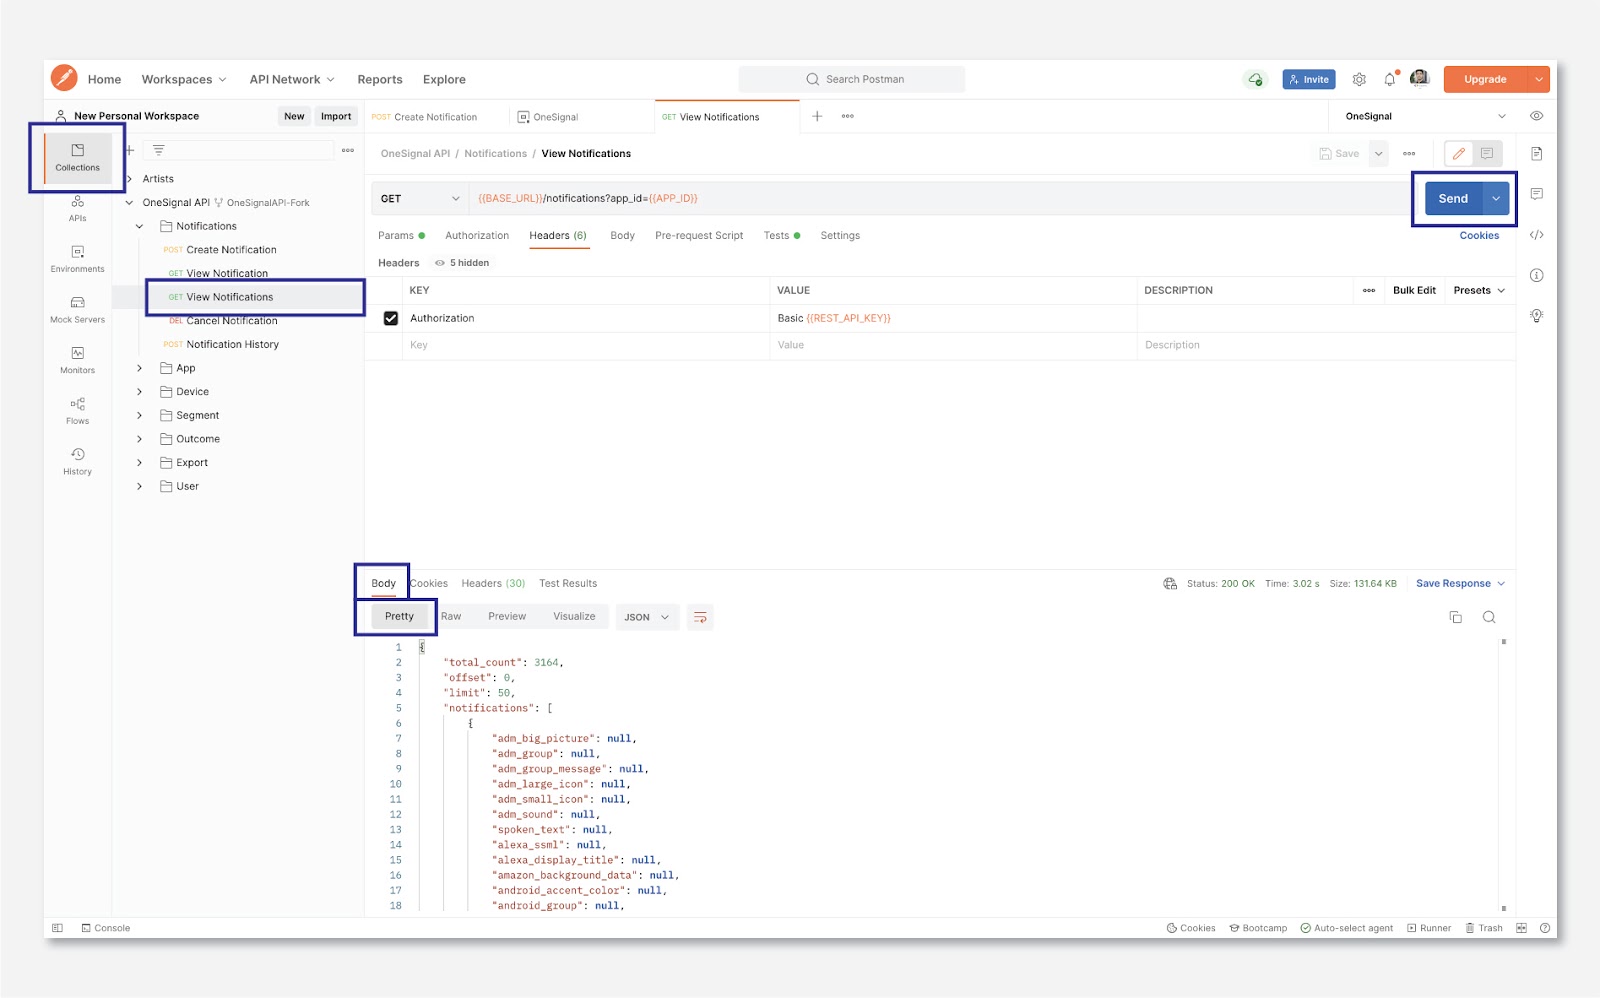
View Notification
View the details of multiple notifications.
Method: GET
Endpoint: https://onesignal.com/api/v1/notifications
@returns {object} response
To view the detail of the notifications, click on Collections on the left side of the menu then expand the dropdown OneSignal->View Notifications. Once you are inside of the View Notifications request, click on Send to trigger a request to the OneSignal API.
At the bottom of this request, you will see a tab that says Body. This tab will have the response you got back from making the request to the OneSignal API.
Part 3: OneSignal Dashboard with Postman Visualizer
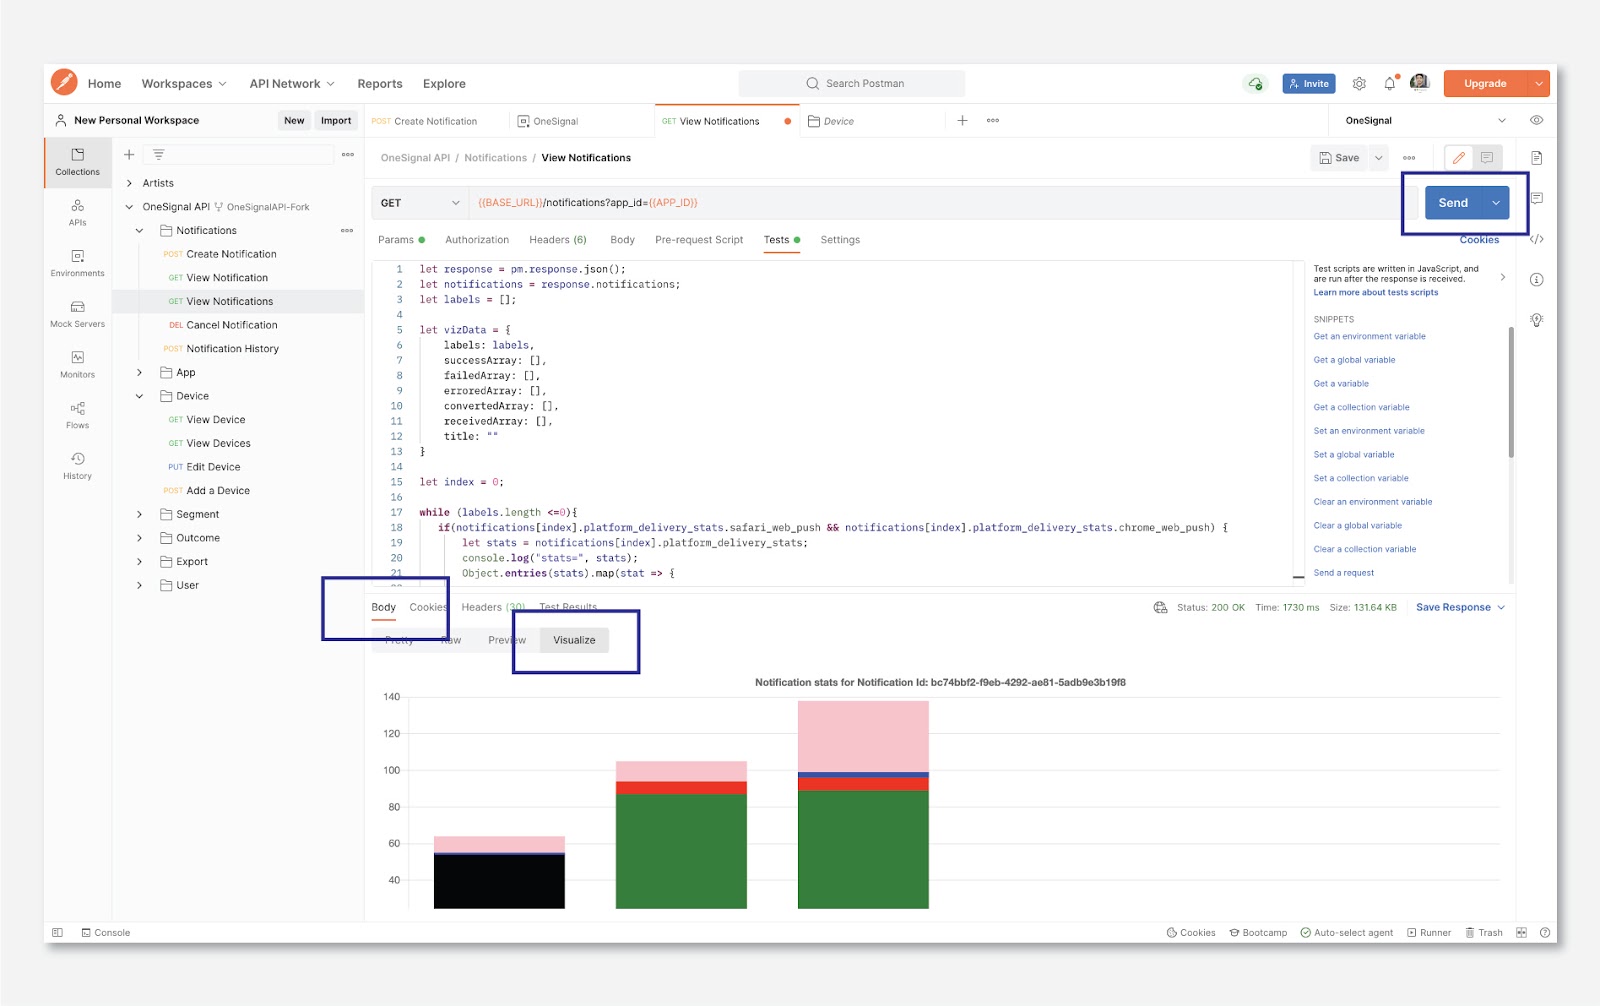
Inside of the View Notifications call, click on the Test tab, here is where we will enter our code to create our OneSignal dashboard using the Chart.JS library inside of the Postman visualizer.

Inside the Test tab, enter the following code:
let response = pm.response.json();
let notifications = response.notifications;
let labels = [];
let vizData = {
	labels: labels,
	successArray: [],
	failedArray: [],
	erroredArray: [],
	convertedArray: [],
	receivedArray: [],
	title: ""
}
let index = 0;
The response variable will be the response that comes back from the request made to the OneSignal API.
In the vizData variable, we will hold the data from each browser and device so we can differentiate if the status of notifications was errored, successful, received, etc.
Now we create a while loop to iterate through the labels of each notification you have sent in your OneSignal app and inside of the, we will check if the notifications meet certain criteria such as being used in safari and chrome. If the criteria are met, we will start allocating the data in each status array for each notification we have sent for the specified browsers and devices.
while (labels.length <=0){
	if (notifications[index].platform_delivery_stats.safari_web_push &&
    	notifications[index].platform_delivery_stats.chrome_web_push) {
		let stats = notifications[index].platform_delivery_stats;
		console.log("stats=", stats);
		Object.entries(stats).map(stat => {
			vizData.successArray.push(stat[1].successful);
			vizData.failedArray.push(stat[1].failed);
			vizData.erroredArray.push(stat[1].errored);
			vizData.convertedArray.push(stat[1].converted);
			vizData.receivedArray.push(stat[1].received);
			vizData.title = `Notification stats for Notification Id: ${notifications[index].id}`
		});
		labels = Object.keys(stats);
		vizData.labels = labels;
	}
	index++;
}
Finally, time to create the template. We need to tell Chart.js how is our graph going to look like. In my case, I decided to use Stacked Bar Graphs.
After the while loop create a template variable as follows:
let template = YOUR GRAPH.JS CODE GOES HERE
Now inside of the table add the next code:
<script src='https://cdnjs.cloudflare.com/ajax/libs/Chart.js/2.9.3/Chart.min.js'></script>
<canvas id="myChart" width="400" height="400"></canvas>
This code will import the Chart.JS lib into your Postman Visualizer and create an HTML canvas element to display the graphs.
The following code will store the graphs created into the canvas. This code below contains all the configuration options to specify what our graph is going to look like. Some of the configuration options contain information about the status of each notification, the color of our graph, the type of graph, the data, and more.
<script>
const ctx = document.getElementById('myChart');
const myChart = new Chart(ctx, {
	type: 'bar',
	data: {
		labels: [],
		datasets: [{
				label: 'Successful',
				backgroundColor: "green",
				data: [],
		    }, {
				label: 'Failed',
				backgroundColor: "red",
				data: [],
			}, {
				label: 'Errored',
				backgroundColor: "black",
				data: [],
			}, {
				label: 'Converted',
				backgroundColor: "blue",
				data: [],
			}, {
				label: 'Received',
				backgroundColor: "pink",
				data: [],
		}],
	},
	options: {
		title: {
			display: true,
			text: 'Notifications'
		},
		tooltips: {
			displayColors: true,
			callbacks:{
				mode: 'x',
			},
		},
		scales: {
			xAxes: [{
				stacked: true,
				gridLines: {
					display: false,
				}
			}],
			yAxes: [{
				stacked: true,
				ticks: {
					beginAtZero: true,
				},
				type: 'linear',
			}]
		},
		responsive: true,
		maintainAspectRatio: false,
		legend: { position: 'bottom' },
	}
});
pm.getData((err, value)=> {
	console.log("value=", value);
	myChart.data.labels = value.labels;
	myChart.data.datasets[0].data = value.successArray;
	myChart.data.datasets[1].data = value.failedArray;
	myChart.data.datasets[2].data = value.erroredArray;
	myChart.data.datasets[3].data = value.convertedArray;
	myChart.data.datasets[4].data = value.receivedArray;
	myChart.options.title.text = value.title;
	myChart.update();
})
</script>
As you can see at the bottom of our template, we are using the pm.getData() method where I’m adding the data and options to my graph inside the postman visualizer.
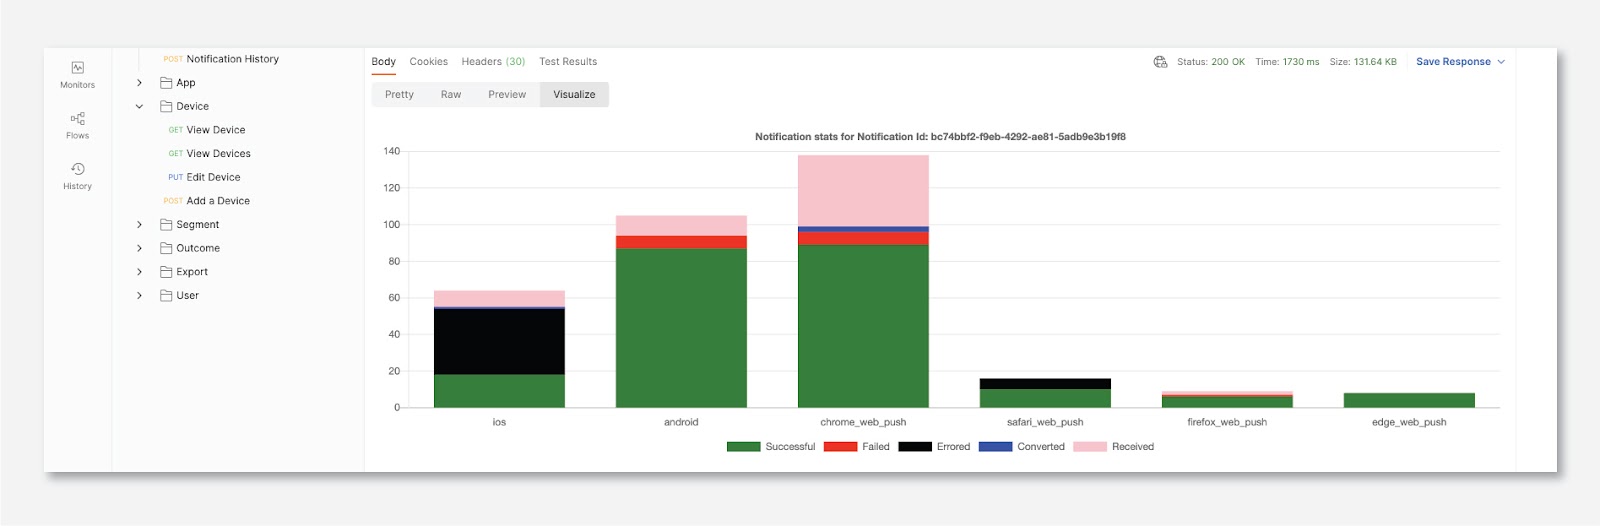
After you have entered all the code above, click on the blue Send button to make the request At the bottom select the Body tab, then click on Visualize to see your beautiful graphs.
If you want to dive directly into the code, don't forget to check the GitHub repo with the code sample or visit the OneSignal Postman collection.
Feel free to test other OneSignal REST API endpoints and let us know what you think!
Stay in Touch
Twitter: Follow our OneSignal Developers Twitter to learn more about OneSignal, technical tips, and the latest events from OneSignal Developers.
Discord Server: The OneSignal Developer community gathers on our public chat server, available on our Discord server. This server is a safe environment to network with other members, ask questions, and learn from each other. It's also a great place to engage with the OneSignal product development team.
Join our OneSignal Developer Community!
The OneSignal Developer community is a group of passionate individuals who work with OneSignal products. Community members have the opportunity to expand their network and knowledge across different technologies.
Learn More About our Developer Community