The more a customer visits your store, the more likely they will be to make a purchase. And the more people feel appreciated by and engaged with your business, the more they are likely to remain loyal and recommend you to others, which helps your business grow. Customer re-engagement is key to any sound e-commerce business strategy, and web push can be a key engagement channel. Below are some examples of how you can make the most out of web push on your e-commerce site.
Send a message to get a previous visitor to come back to your site
Let's say a visitor comes to your site once, but hasn't been returned in over a week. Follow these steps to automatically send a reminder for them to come back to your site.
Step 1. Set up your Message Template
First, let's set up the message you'll want to send a visitor to get them to come back to your site. We've prepared a default message for you below.
- Log into your OneSignal dashboard.
- Go to Messages>Templates and click on New Push Template.
In the body of the message template, cut and paste the text here or customize it to your liking.
- Template Name:
Come Back
- Title:
You're missing out on new items!
- Message:
It's been a while. We've got some great new items in stock we think you'll love. Check them out!
- Image: [Upload an icon to use, or leave it blank]
- Launch URL: [insert the URL of your website, example - http://mysite.com]
- Click SAVE
Step 2. Set up an Automated Message
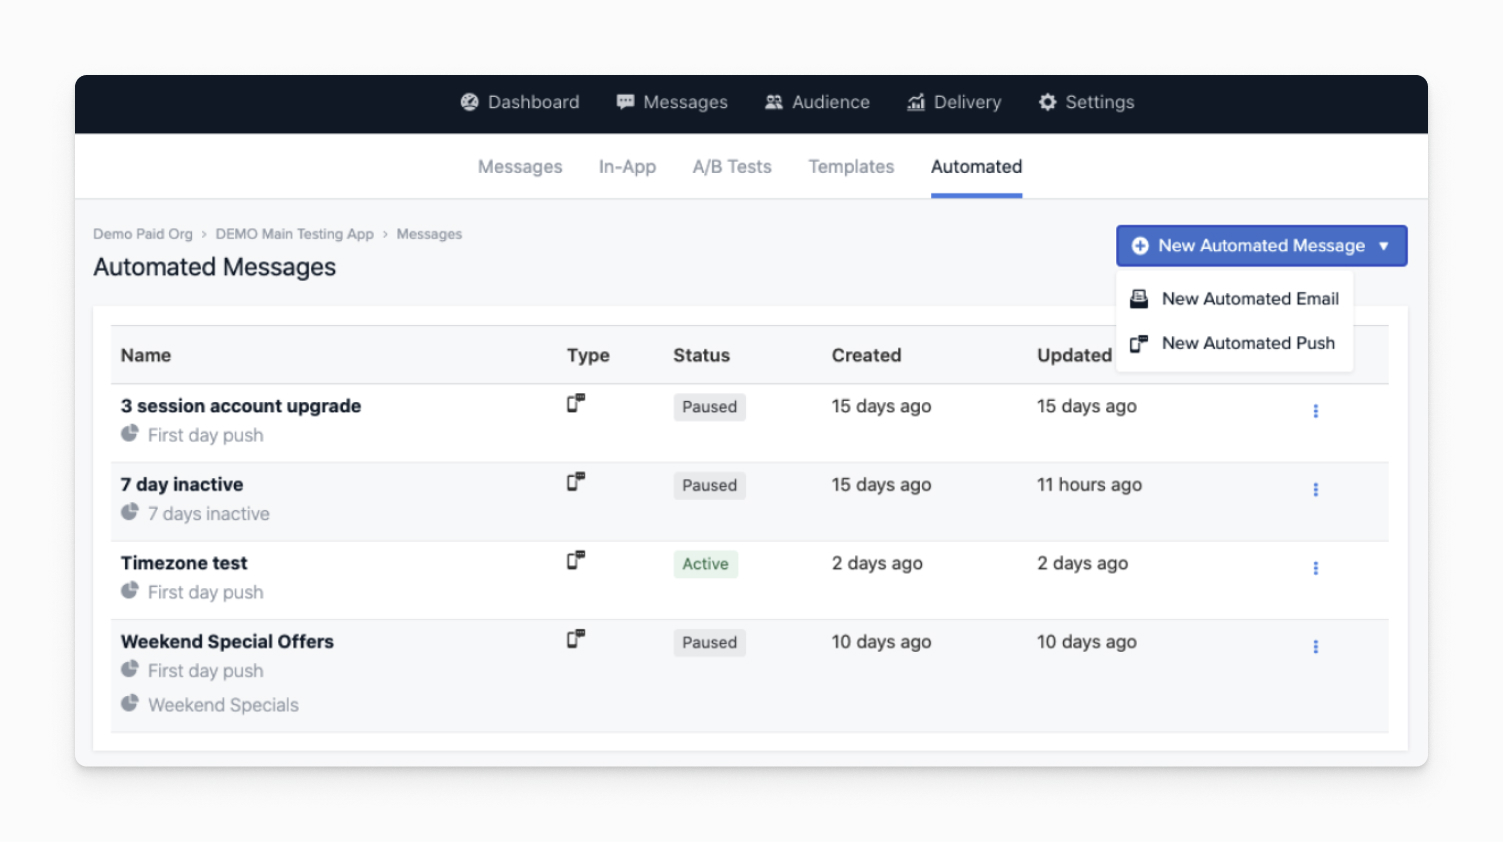
In the OneSignal Dashboard, go to Messages>Automated and click on New Automated Message and choose New Automated Push. Name your message.
Message Name: Come Back after 7 Days
**You can name the message anything you like, but it's always best to be descriptive.**
- Under Audience, choose the radio option for Send to Particular Segment.
- Under Who should receive this campaign?, click + Add Segment and select the Inactive Users Segment. Make sure to click X next to the default Segment to remove it.
- Under What template do you want to send, click the Dropdown arrow and choose the Template you created in Step 1 - Come Back.
- Under Deliver to users more than once?, check the box for If the user returns to the app.
-
Click on Make Active.
And that’s it. Now, whenever someone visits your site but hasn't returned in 7 days, they will automatically be sent a notification asking them to come back to check your store for new stock! Clicking on that message will take them right back to your site.
Send product announcements based on visitor interests
Sending messages to visitors based on the specific things they're interested in is a best practice for e-commerce sites and can help keep subscribers engaged and subscribed.
Step 1. Configure Categories in your Slide Prompt
**This step assumes you've already set up the Slide Prompt on your website.**
Once, you've got that working, in the OneSignal dashboard, go to Apps and click on your App. Then go to Settings and click on the Edit Icon next to All Browsers.
- Under Permission Prompt Setup, click on the Edit Icon next to Slide Prompt(Recommended).
- Under Slidedown Prompt, enable the toggle for Categories. This will reveal the configuration options for Categories.
- Under Tag Key, name your Data Tag and choose a label for it to display to the Visitor.
Tag Key: prefer_newitems
Label: New Items
- Click on Add Category to add more:
Tag Key: prefer_saleitems
Label: Items on Sale
Tag Key: prefer_limiteditems
Label: Limited Items
Tag Key: prefer_pricedrops Label: Price Drops
- Click Done and Save to save your configuration preferences.
Now, whenever a visitor subscribes to notifications, they will be able to choose from the Categories you set up, signaling those are the things they are interested in. Their preferences will be saved as a Data Tag that you can use to target them using Audience Segments.
Step 2. Create Audience Segments for the Categories you set up.
In the OneSignal dashboard, Go to Audience>Segments and click on New Segment.
- Name your Segment:
Users interested in New Items
- Click on the + symbol next to User Tag and type in the Keys from your Categories you set up in Step 1.
prefer_newitems
- Choose is from the dropdown and set 1 for the value. Then click on Create Segment.
- Name your Segment:
Users interested in Price Drops
- Click on the + symbol next to User Tag and type in the Keys from your Categories you set up in Step 1.
prefer_pricedrops
- Choose is from the dropdown and set 1 for the value. Then click on Create Segment.
Repeat.
And that’s it. Now, whenever you send a message that is related to one of those categories, you can Target that specific Audience Segment to ensure that the message is relevant to them! For example, if you have a new item available, you'll want to send that new item announcement to the Segment Users interested in New Items.
Send a message to visitors who browse a lot without purchasing
Let's encourage window shoppers to buy something. In order to accomplish this, you need to track whether or not the subscriber has made a purchase.
Step 1. Add code to track item purchased.
// replace ".submit-payment" with the class name of the element that submits a payment for item
const submitPurchaseButton = document.querySelector(".submit-payment");
if (
    typeof submitPurchaseButton != "undefined" &&
    submitPurchaseButton != null
  ) {
    submitPurchaseButton.addEventListener("click", () => {
      OneSignal.push(function() {
          let timestamp = Math.floor(Date.now() / 1000);
          OneSignal.sendTags({
            purchase_made: timestamp
          });
       });
    });
  }
});
- Set a Data Tag purchase_made to true for capturing that an item was purchased on your site. You'll set this Data Tag when some hits the "confirm purchase" button on your store.
Step 2. Create a Segment for Visitors who browse but don't buy.
In the OneSignal dashboard, Go to Audience>Segments and click on New Segment.
- Name your Segment:
3+ Visits No Purchase
- Click on the + symbol next to User Tag and type in the Keys you captured in Step 1.
purchased_made
- Set this to does not exist.
- Click + Add Filter and then click on the + symbol next to Session Count and select greater than with 2 sessions.
- Click on Create Segment. Now, whenever a subscriber has returned to your site 3 time AND never made a purchase, they'll be added to this Segment.
Step 3. Set up your Message Template
Go to Messages>Templates and click on New Push Template. In the body of the message template, cut and paste the text here or customize it to your liking.
- Template Name:
20% Discount Code
- Title:
Would a 20% discount help you make up your mind?
- Message:
We know that sometimes it's hard to choose from so many amazing items, so how about a 20% discount? Use coupon code: 20Discount at checkout!
- Image: [Upload an icon to use, or leave it blank]
- Launch URL: [insert the URL of your website with discount option in URL, example - http://mysite.com/?20DISCOUNT]
Step 4. Set up an Automated Message
In the OneSignal dashboard, go to Messages>Automated and click on New Automated Message and choose New Automated Push.
- Name your message.
3+ Visits No Purchase - 20% Discount
**You can name the Message anything you like, but it's always best to be descriptive.**
- Under Audience, choose the radio option for Send to Particular Segment.
- Under Who should receive this campaign?, click the X next to the default to remove it. Then click the + symbol next to 3+ Visits No Purchase to add that Segment.
- Under What template do you want to send, click the Dropdown arrow and choose the Template you created in Step 3.
- Under Deliver to users more than once?, check the box for After a certain amount of time and set it to 2 weeks.
- Click on Make Active.
And that’s it. Now, whenever a subscriber has returned more than 3 times AND they've not made a purchase, they will receive a message encouraging them to make a purchase every 2 weeks using a 20% discount code on checkout until they purchase.
Send a survey to visitors who spend a lot at your store
Let's say that you want to be able to survey your biggest spenders to help improve your site. In order to accomplish this, you need to track how much they've spent in your store.
Step 1. Add website code to pull spend from your webstore.
// replace ".submit-payment" with the class name of the element that submits a payment for item
const submitPurchaseButton = document.querySelector(".submit-payment");
  if (
    typeof submitPurchaseButton != "undefined" &&
    submitPurchaseButton != null
  ) {
    // replace ".checkout-price-total" with the class name of the element that displays checkout price
    const checkoutPriceTotal = document.querySelector(".checkout-price-total")
      .innerText;
    submitPurchaseButton.addEventListener("click", () => {
      updateOSOnCartPurchase(checkoutPriceTotal);
    });
  }
});

function updateOSOnCartPurchase(checkoutPriceTotal) {
  let purchasePriceTotal = parseInt(checkoutPriceTotal);

  OneSignal.push(function () {
    OneSignal.getTags(function(tags) {
      var purchase_amount = 0;
      if (tags.purchase_amount) {
        purchase_amount = parseInt(tags.purchase_amount)
      }
      console.log("current purchase_amount: ", purchase_amount);
      purchase_amount += purchasePriceTotal
      OneSignal.sendTags({
        purchase_made: "true",
        purchase_amount: purchase_amount,
      }).then(function (tagsSent) {
        // Callback called when tags have finished sending
        console.log(tagsSent);
      });
    })
  });
}
This expands what we set earlier with the purchase_made tag and sets a Data Tag for purchase_amount to capture how much money a user has spent in your store.
Step 2. Create a Segment for visitors who have spent more than $500.
In the OneSignal dashboard, Go to Audience>Segments and click on New Segment.
- Name your Segment:
Spent more than $500
- Click on the + symbol next to User Tag and type in the Keys you captured in Step 1.
purchase_amount is greater than 499
- Click on Create Segment.
Now, whenever a visitor has spent more than $500 in your store, they'll be added to that Audience Segment.
Step 3. Set up your Message Template
Go to Messages>Templates and click on New Push Template. In the body of the message template, cut and paste the text here or customize it to your liking.
- Template Name:
Big Spender Survey
- Title:
We appreciate your business!
- Message:
Thank you for supporting our business! We'd love to get your input on how we can serve you better via a short survey.
- Image: [Upload an icon to use, or leave it blank]
- Launch URL: [insert the URL to your survey, example - http://mysite.com/survey]
Step 4. Set up an Automated Message
In the OneSignal dashboard, go to Messages>Automated and click on New Automated Message and choose New Automated Push.
- Name your message.
Big Spender Survey
**You can name the Message anything you like, but it's always best to be descriptive.**
- Under Audience, choose the radio option for Send to Particular Segment.
- Under Who should receive this campaign?, click the X next to the default to remove it. Then click the + symbol next to Spent more than $500 to add that Segment.
- Under What template do you want to send, click the Dropdown arrow and choose the Template you created in Step 3 - Big Spender Survey.
- Under Deliver to users more than once?, do not check any box.
- Click on Make Active.
And that’s it. Now, whenever a visitor has spent more than $500, they'll receive a message asking them to complete a survey to gain valuable feedback for your business.
Get visitors to complete a purchase through abandoned cart reminders
Let’s say an online shopper adds an item to their cart, but they never complete the purchase. In this case, you'd likely want to send a push notification to remind them that they still have an item in their cart and encourage them to come back to complete their purchase. Here’s how to set that up.
Step 1. Add code to track that an item was added to a cart
In order to add an item to their cart, a shopper normally clicks on an “Add to Cart” button. Adding this code will allow OneSignal to know that that button was clicked, and then keep track of:
- Time the item was added to the cart
- Product name
- URL location of the picture of the product
< script >
 //Example if page has a single "Add to cart" button like "product description" page
 window.addEventListener("load", () => {
     // replace ".add-to-cart-btn" with the class name of your cart button element
     const addToCartButton = document.querySelector(".add-to-cart-btn");
     // replace ".product-title" with the class name of the element containing your product name
     let productName = document.querySelector(".product-title").innerHTML;
     console.log("productName: ", productName);
     // replace ".product-img" with the class name of your product img element
     let productImageURL = document.querySelector(".product-img").src;
     console.log("productImageURL: ", productImageURL);
     addToCartButton.addEventListener("click", () => {
         OneSignal.push(function () {
             let timestamp = Math.floor(Date.now() / 1000);
                 OneSignal.sendTags({
                     cart_update: timestamp,
                     product_name: productName,
                     product_image: productImageURL,
                 }).then(function (tagsSent) {
                     // Callback called when tags have finished sending
                     console.log(tagsSent);
                 });
             });
         });
 });
</script>
Step 2. Add code to track if the cart was emptied or a purchase was completed
If a shopper removes an item from their cart or completes a purchase, they shouldn’t be receiving an abandoned cart reminder. Adding this code will enable an Empty Cart or Complete Purchase button to clear the reminder.
<script>
//Removes the cart tags, call when user purchases or removes items from cart
function removeCartTags(){
 OneSignal.push(function () {
   OneSignal.sendTags({
     cart_update: "",
     product_name: "",
     product_image: "",
   }).then(function (tagsSent) {
     // Callback called when tags have finished sending
     console.log(tagsSent);
   });
 });
}
</script>
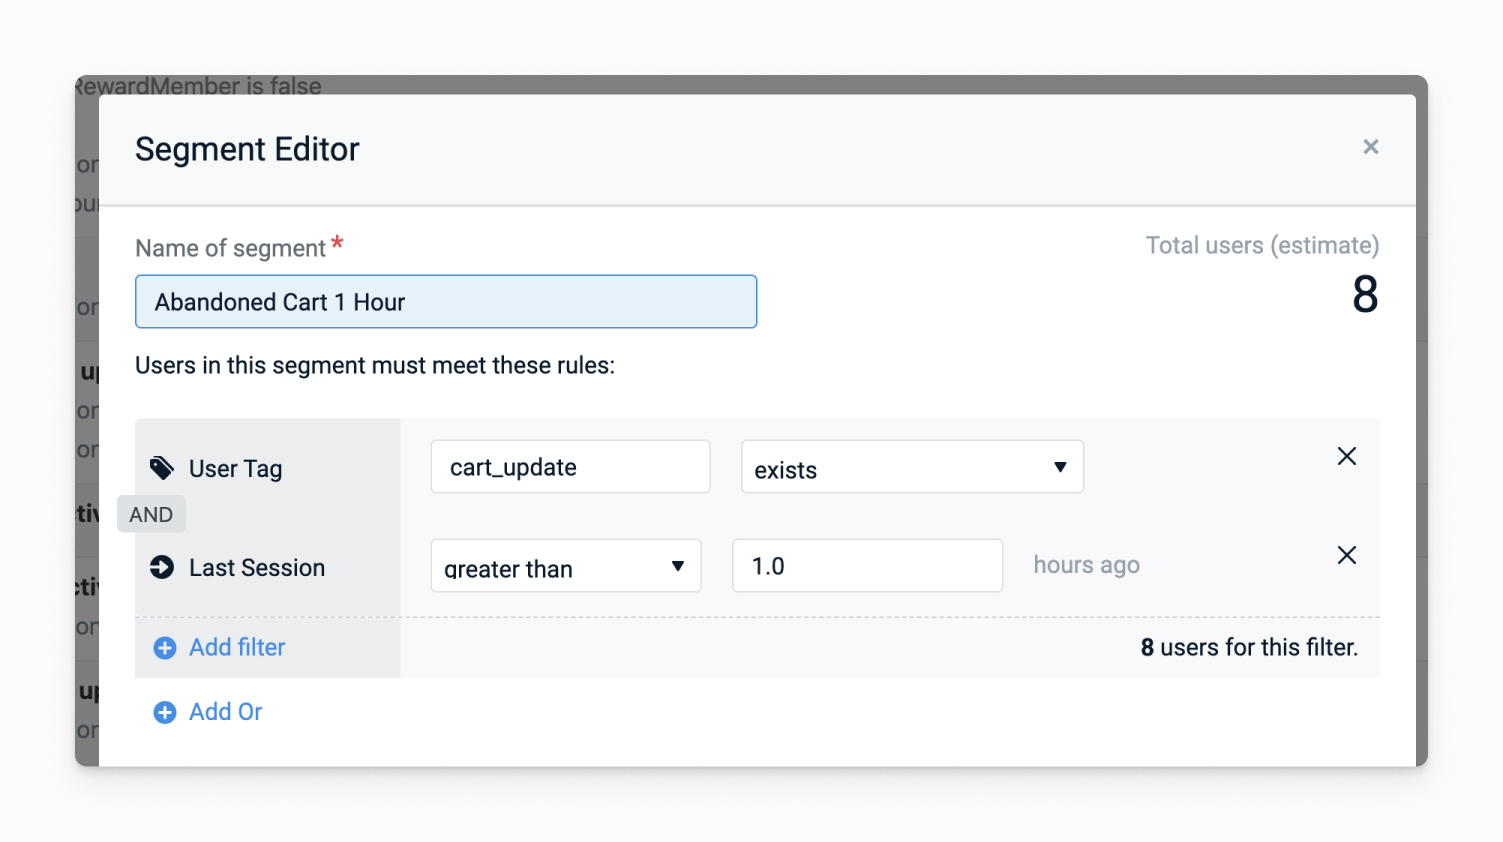
Step 3. Set up the abandoned cart segment in the OneSignal dashboard
Now that your code is tracking the appropriate information, it’s time to set things up so that a message will automatically sent.
- First, in your OneSignal dashboard, go to Audience > Segments.
- Select the User Tag filter
- Set cart_update to exists
- Select Add Filter to create an AND relationship.
- Select Last Session filter and set greater than 1
- Name the Segment Abandoned Cart 1 Hour
Step 4. Set up the message you want to go out for the reminder
Now we get to the fun part! This is where you get to flex your creative copy muscle and figure out the best message to send to encourage someone to complete their purchase. To set this up, you’ll need to create a message Template so that OneSignal knows what content you want to send in your message.
In your OneSignal dashboard, go to Message > Templates.
- Name the template
Abandoned Cart 1 Hour - Add your Title
Example Don’t forget about your purchase! - Add your Message
Example Your new {{product_name | default: "item"}} is waiting for you!
Note: {{product_name | default: "item"}} will be replaced by whatever value is set for that tag. If no tag is set, then "item" will be used. - Set the Image to be
{{product_image}}
Note: {{product_image}} will be replaced with the URL of the image to the product. If tag value is not a direct link to the image, then it will not show. - Set the Launch URL to be0
URL of your checkout page.
Note: if the checkout page is unique per user, we would need to either link to the cart page (if not unique) or use more tag substitution.
Example: if your checkout page is https://example.com/username we need to tag the user with a user_name tag so their username can be replaced if we use: https://example.com/{{user_name}}/checkout - Click SAVE to save the message Template. You can edit this Template at any time.
Step 5. Set the reminder message to go out automatically.
Now that we know when a shopper adds an item to their cart and what message to send them, we can now configure these reminders to go out automatically.
To enable this, within the OneSignal dashboard, go to Messages > Automated > New Automated Push.
- Name the Automated Message: Abandoned Cart 1 Hour
- Select Send to Particular Segment(s)
- Click X on the Subscribed Users Segment
- Click Add Segment and select + next to the Abandoned Cart 1 Hour segment.
- Select the Message Template: Abandoned Cart 1 Hour
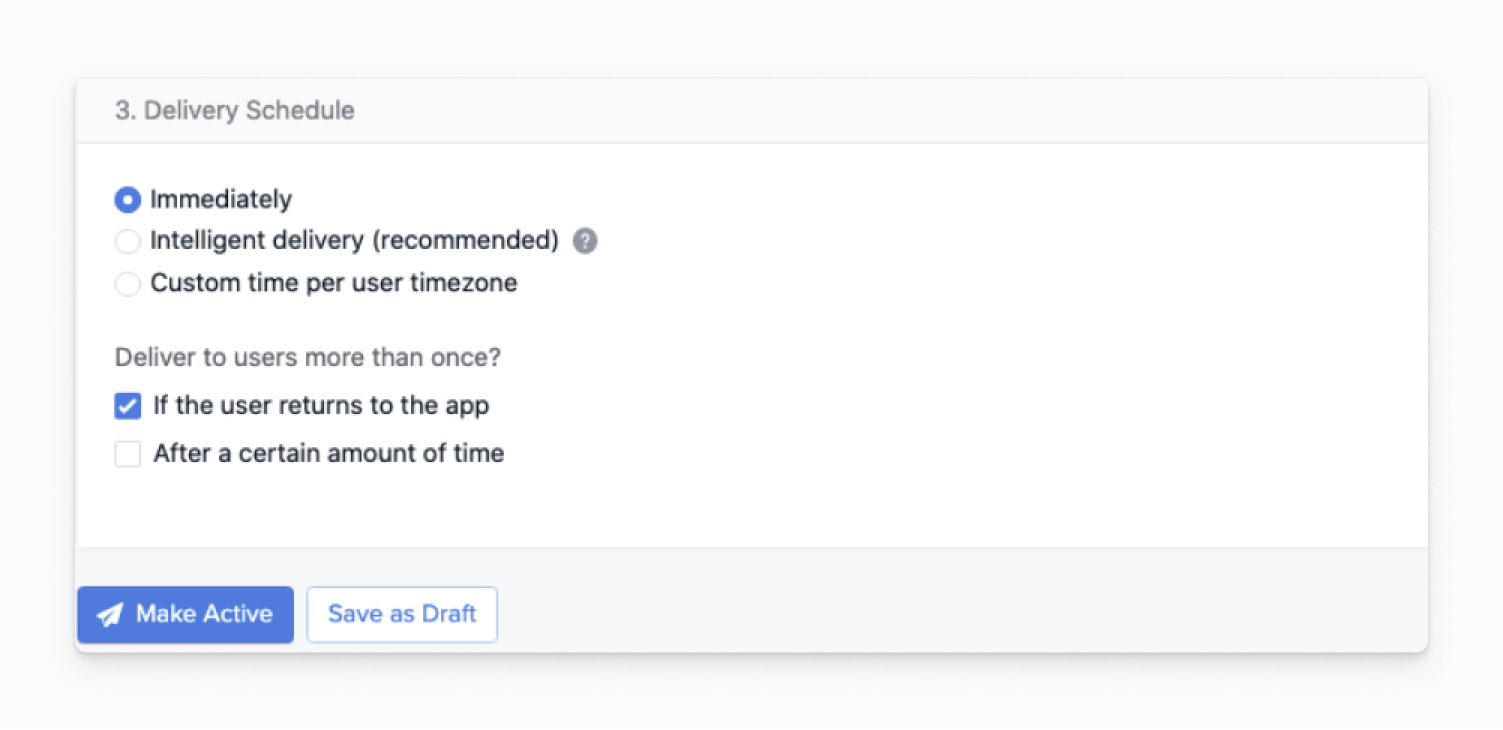
- Set the Delivery Schedule to be Immediately
- Select If the user returns to the app
- Click Make Active
And that’s it. Now, whenever a shopper adds an item to their cart, we’ll store the product name, the url of the image for that product, and the last time the shopper visited your site. If a shopper still has an item in their cart when they leave your website, they will automatically receive a custom tailored reminder to complete their purchase one hour after leaving. Clicking on that message will take them right back to their checkout page, where they can complete their purchase.
This is the basic implementation of Abandoned Cart Reminders that you can configure, and you can accomplish this entirely with our free plan. For a look at more advanced implementation, please check out our documentation here.
We hope that you're now empowered for success with your e-commerce site!
The preceding examples are just the tip of the iceberg. Feel free to customize the examples to your specific needs and brand voice, or come up with new ways to super-charge your customer re-engagement strategy.
OneSignal paid plans give you access to more complex implementations that are even better tailored to your shoppers, often increasing conversion rates which leads to greater revenue for your e-commerce site. For a look at more advanced implementation examples, please check out our documentation.