It’s not enough anymore to send blast emails or push campaigns to all of your users and expect long-term ROI growth. Today, 91% of consumers say they are more likely to shop with brands that serve up personalized, relevant content than those that don’t. In short, if your messaging strategy doesn’t cater to each individual user, you’re quickly falling behind your competition.
Sending hyper-relevant messages at scale shouldn’t require extra time or headache, but it does require the right tools. OneSignal’s Data Tag and Segmentation tools make it easy to maintain meaningful connections with users as your business grows.
What are Data Tags?
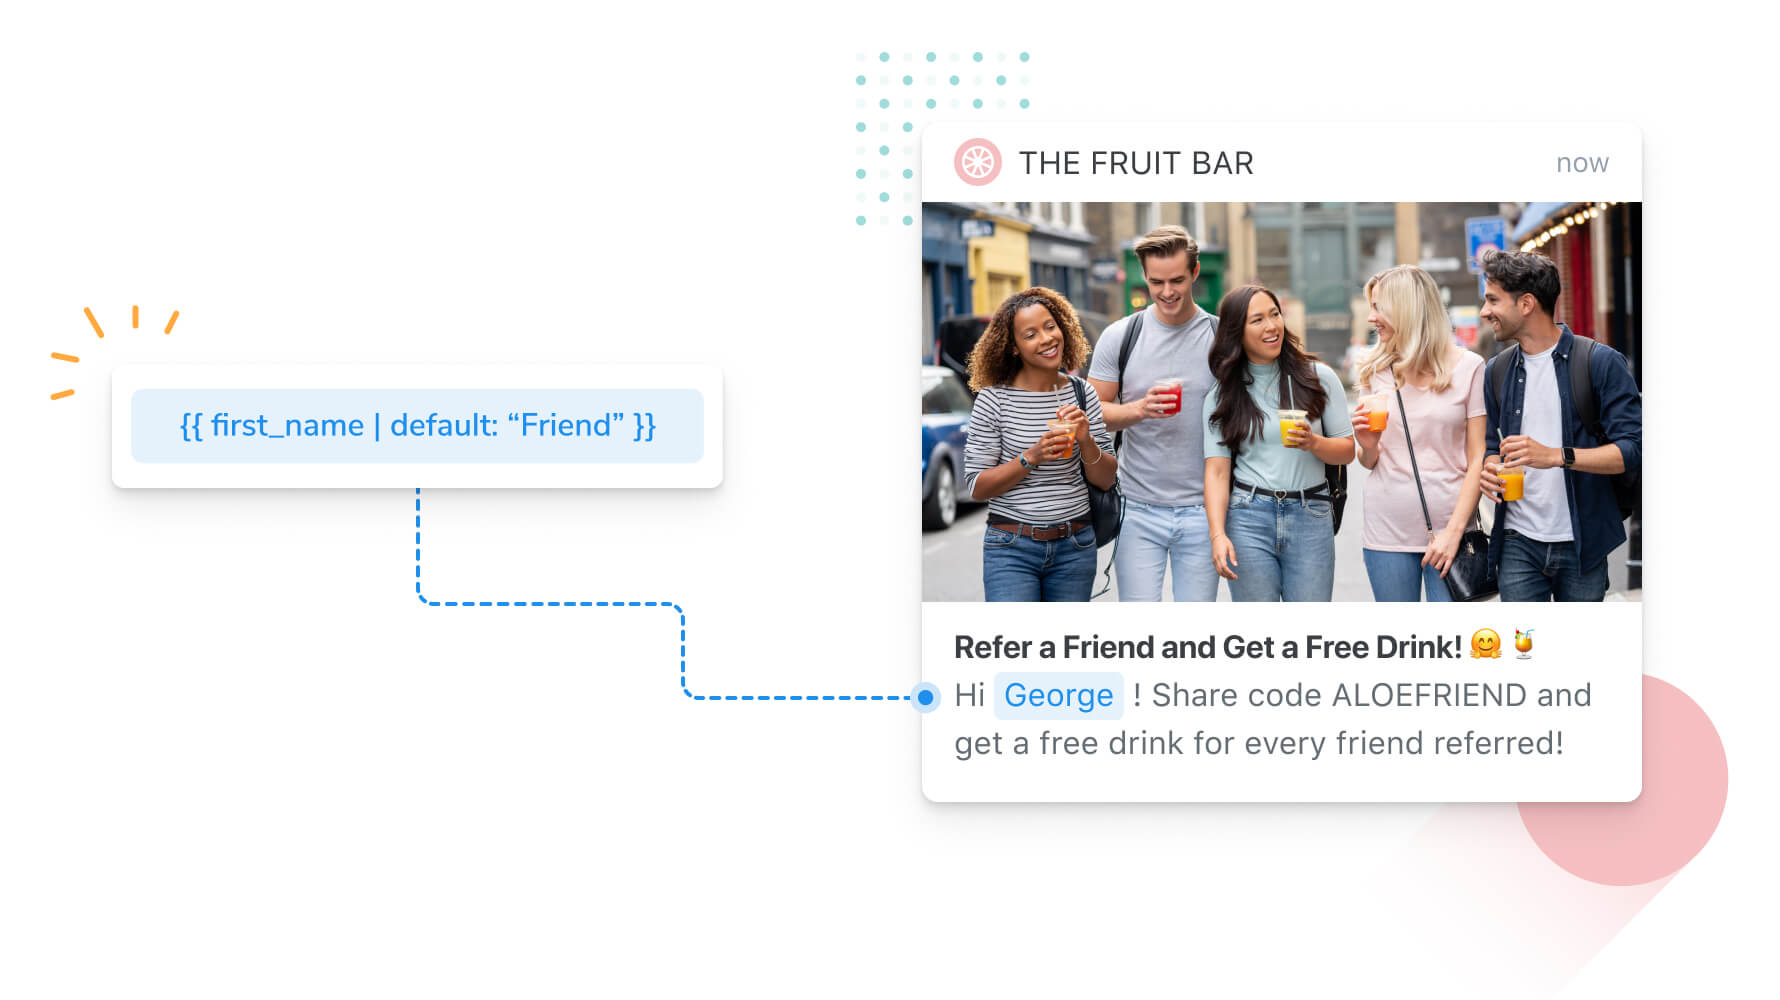
Data Tags are composed of two things: a key and a value. The key allows you to name the tag, the value is what the tag equals. They can be customized allowing you to track what your users do on the device level, from making a purchase, to beating their high score in a game, or posting new content to followers. Using tags also makes it easy to send personalized messages to a large audience without doing a lot of heavy lifting. For instance, you can use data tags to address a user by name, mention a past purchase, or congratulate them on reaching a new level in a game — the possibilities are endless!
Examples of Data Tags:
- First and Last name - {first_name: Mark, last_name: Anthony}
- Product added to cart & Purchase - {cart_update:50000, Purchase:Sunglasses}
- Premium Users - {premium_user: 1, last_session: 60480}
In addition to making your job easier, Data Tags will help you create a more seamless user experience by delivering the type of personalized, timely messages that users expect. As you start to build out different personalization tags, keep these best practices in mind.
Hone Your Message Targeting, Timing, and Relevance
You can use OneSignal’s Segmentation feature to target users with a specific subset of Data Tags and conditions to send the right message, to the right person, at the right time.
Below, we’ve outlined three simple ways to use Data Tags to improve your customer communication strategy.
Using Data Tags to Segment Users by Preferences and Interests
Before you can personalize your messages, you’ll first need to identify and group users based on their interests/preferences using Data Tags.
For example, let's say your goal is to group users based on what types of messages they do and don't want to receive from your brand. A great way to do this is by prompting visitors with a message asking them to choose what types of brand communication they’d like to receive. Using the Category Slidedown feature, users can select from your customized category names to indicate what they’re interested in.
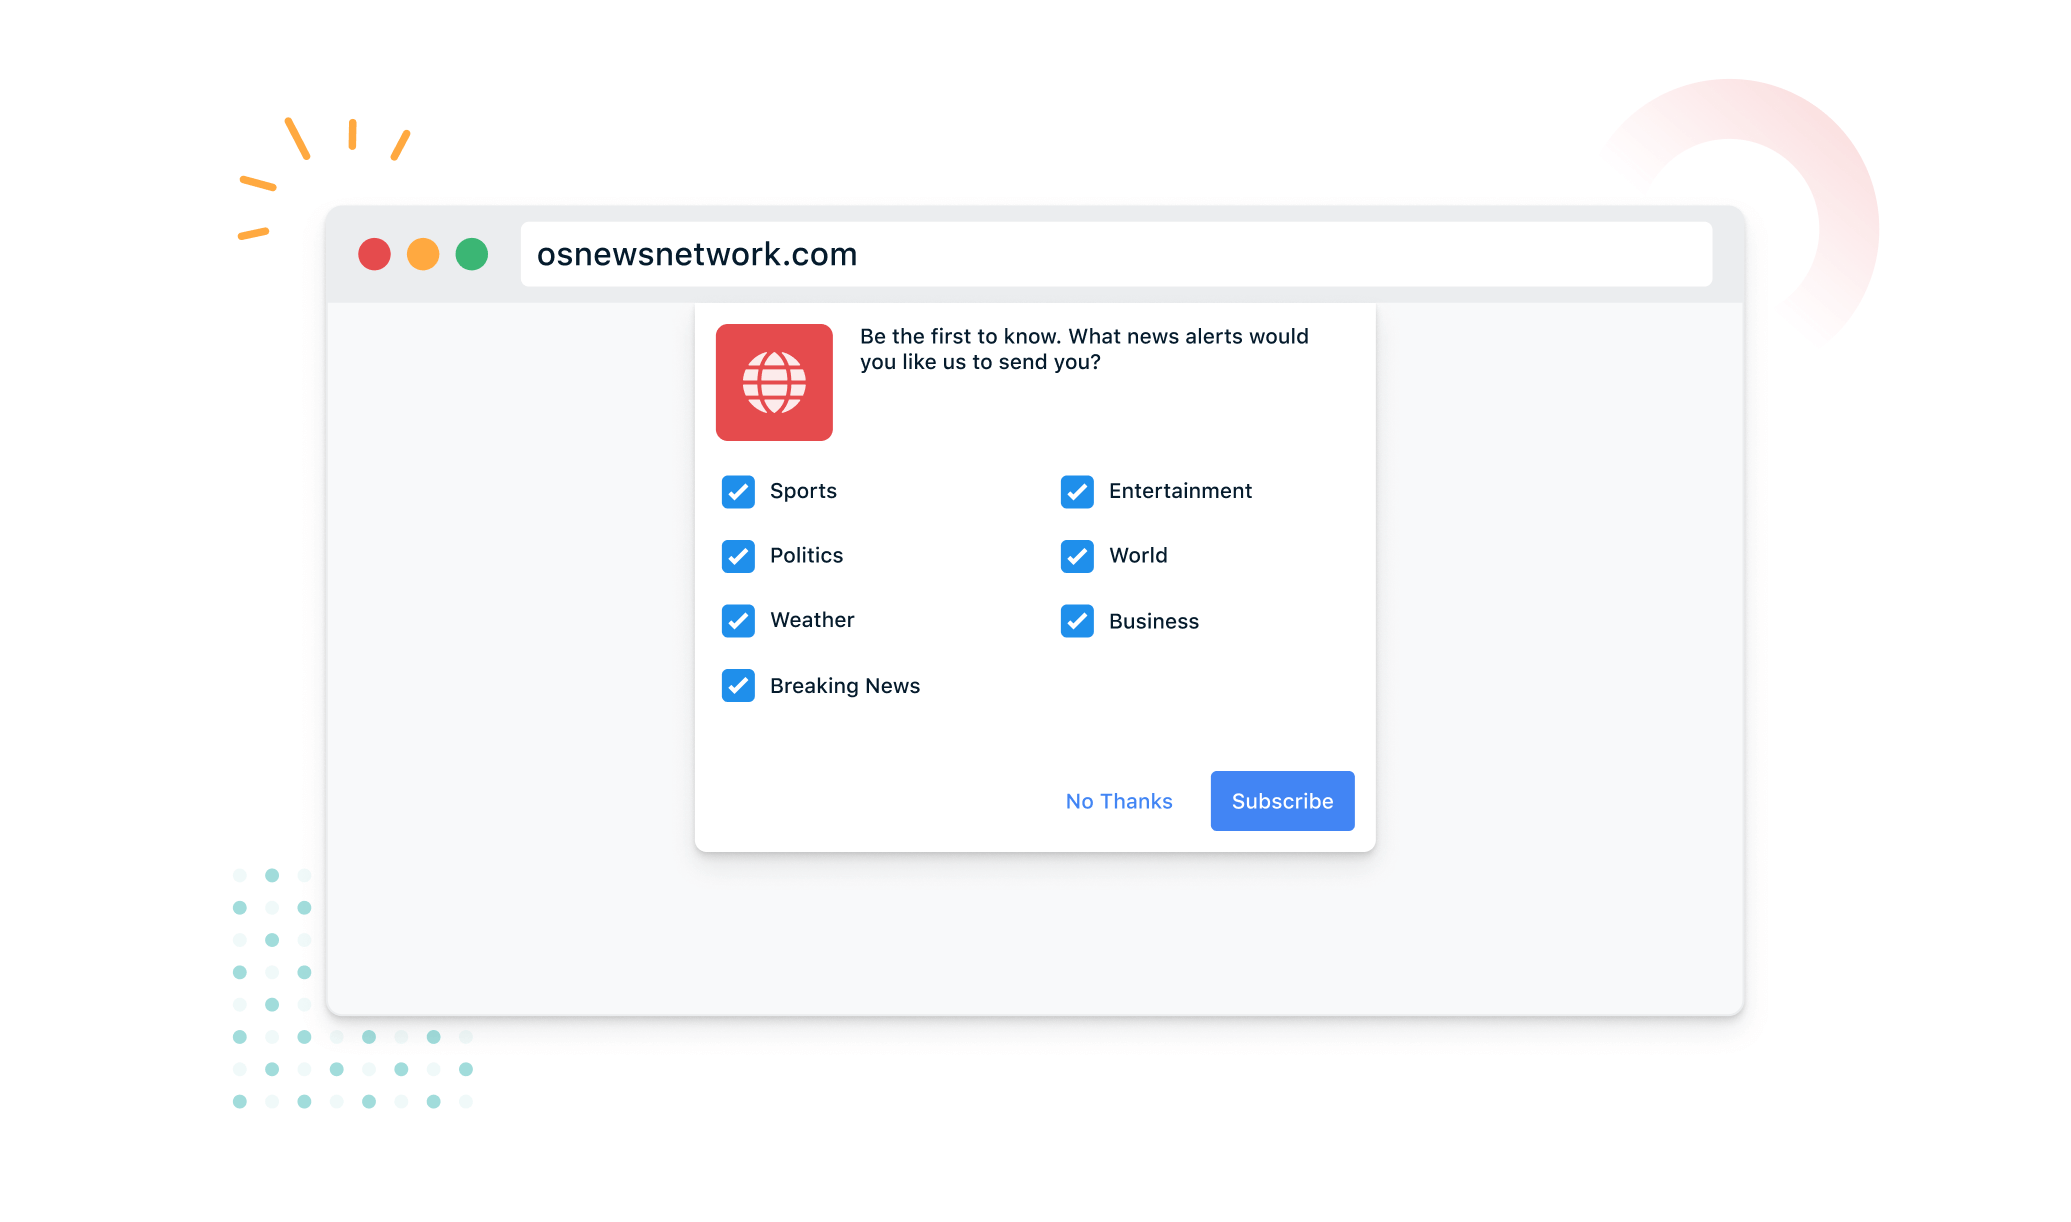
When a user checks an option in the message, their selection will automatically be saved in your OneSignal database as a Data Tag.
For instance, if a user clicks an option to receive “Breaking News” communication, they will be tagged with {Breaking_News: 1}. If they do not click this option, then a false tag {Breaking_News:0} will be applied to save their preference.
Now, you can begin to segment users based on the categories they selected. Doing so will allow you to craft messages based on their interests and will ensure you’re not overwhelming them with irrelevant or unwanted communication.
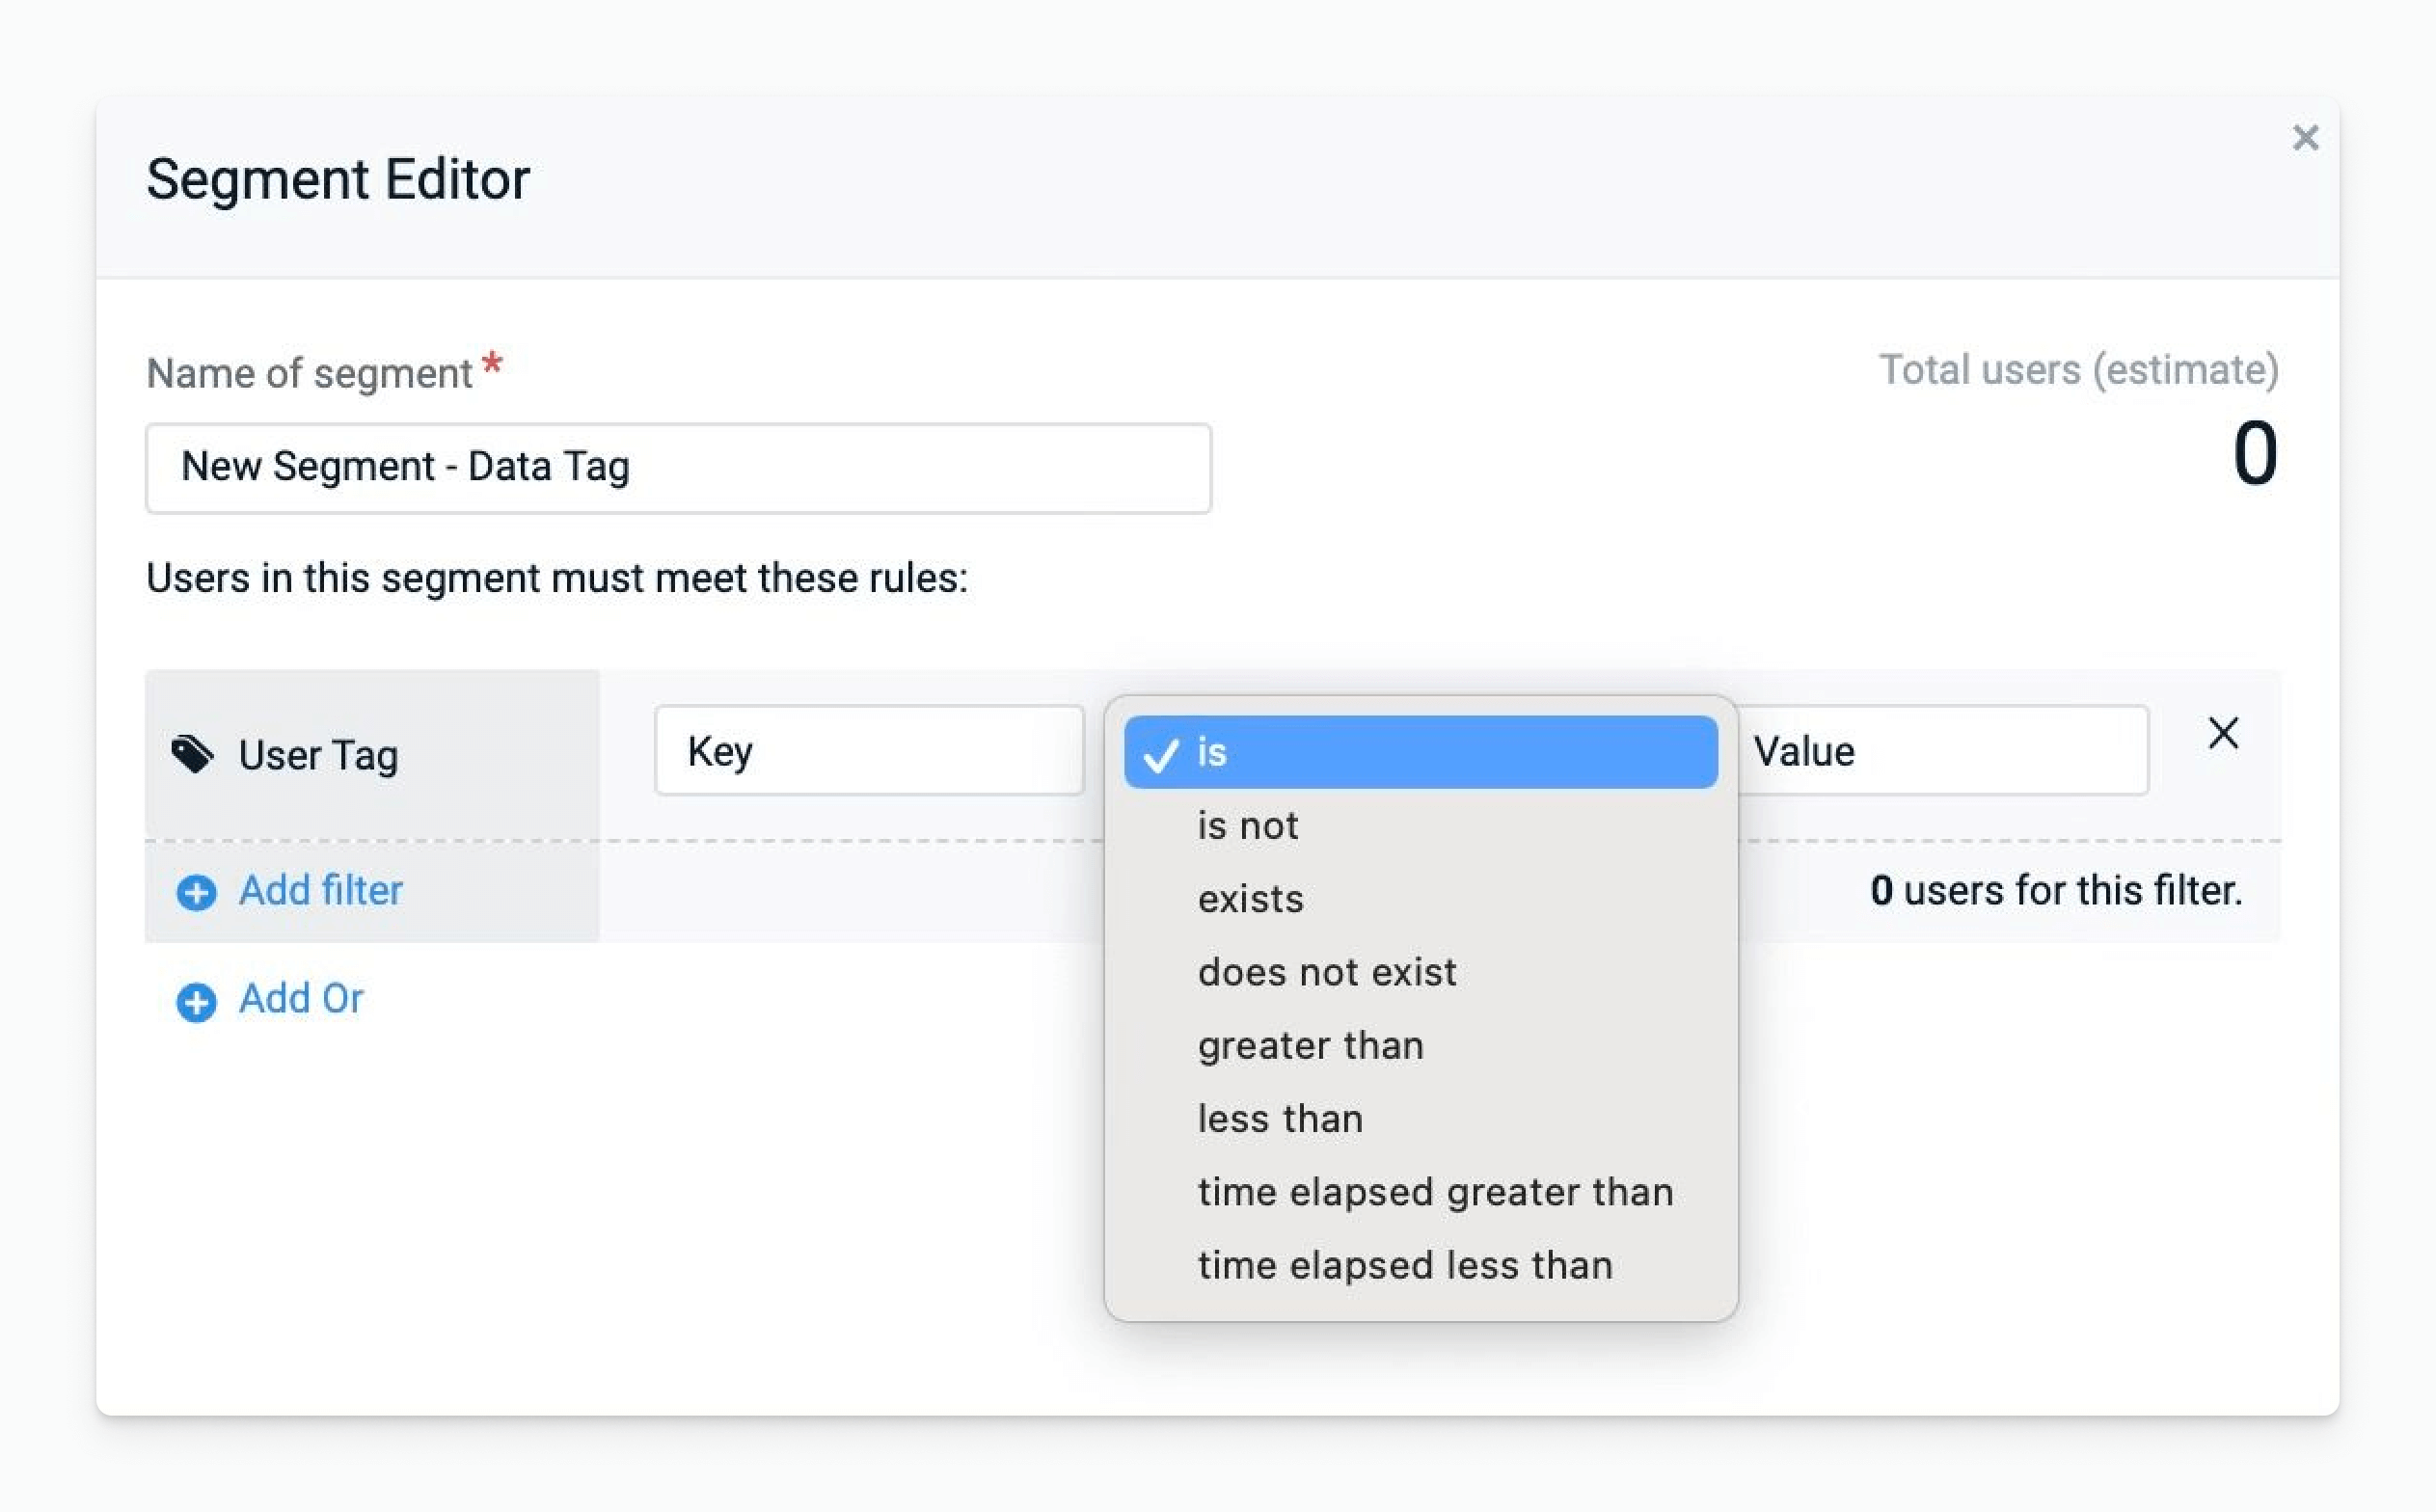
To start segmenting users by Data Tags, follow these simple steps:
1. Navigate to the Segment tool in your OneSignal dashboard.
2. Create and name a new Segment based on the Data Tags you’d like to leverage.
3. Choose the Data Tag option as a filter and add the tags you’d like to use to filter your audience.

Using Data Tags to Personalize Messages Based on User Attributes
Data Tags can also be used to personalize messages in relation to a user’s activity or behavior on your platform.
For example, let’s say you created a mobile gaming app. You notice that a majority of users aren’t able to complete level 10 of the game, and consequently, usage drops after a user completes level 9. After you make updates to level 10, you may want to send out a message to re-engage users who reached this level but did not complete it.
To begin, craft your message headline and leverage Data Tags to make the content more personal.
Message Headline:
“Hello, George! We just added new control options, come back, and see if you can beat level 10!”
Data Tags Used: {first_name: George, current_level:10}
This is called tag substitution, and is a method of using Data Tags within a message as personalization “tokens,” allowing you to send highly specific and contextual messages at scale.
Once this is set, you can use the “tag key” from your Data Tags to personalize the body of the message. Doing so will automatically display the value of that tag at the time when the message reaches the user’s device.
To target users who reached level 10 but haven’t used the platform recently, use Data Tags to segment your audience by time elapsed since their last session and game level. This can be achieved with your segment builder tool.

Using Data Tags for Event-Based Messaging and Transactional Notifications
Another great use case for Data Tags is to send a message based on something your users did or something happening in real time.
Examples of event-based messages:
- Sending a hockey game score update during a live NHL game.
- Sending an SMS message about a gate change the day of a scheduled flight.
- Notifying a user when a person they follow posts new content.
- Congratulating a user for placing their first order and offering a discount on their next purchase.
- Sending an abandoned cart notification 24 hours after someone leaves the checkout page with completing their purchase.
This type of targeting requires using conditional operators within OneSignal’s Segment Builder/Editor tool.
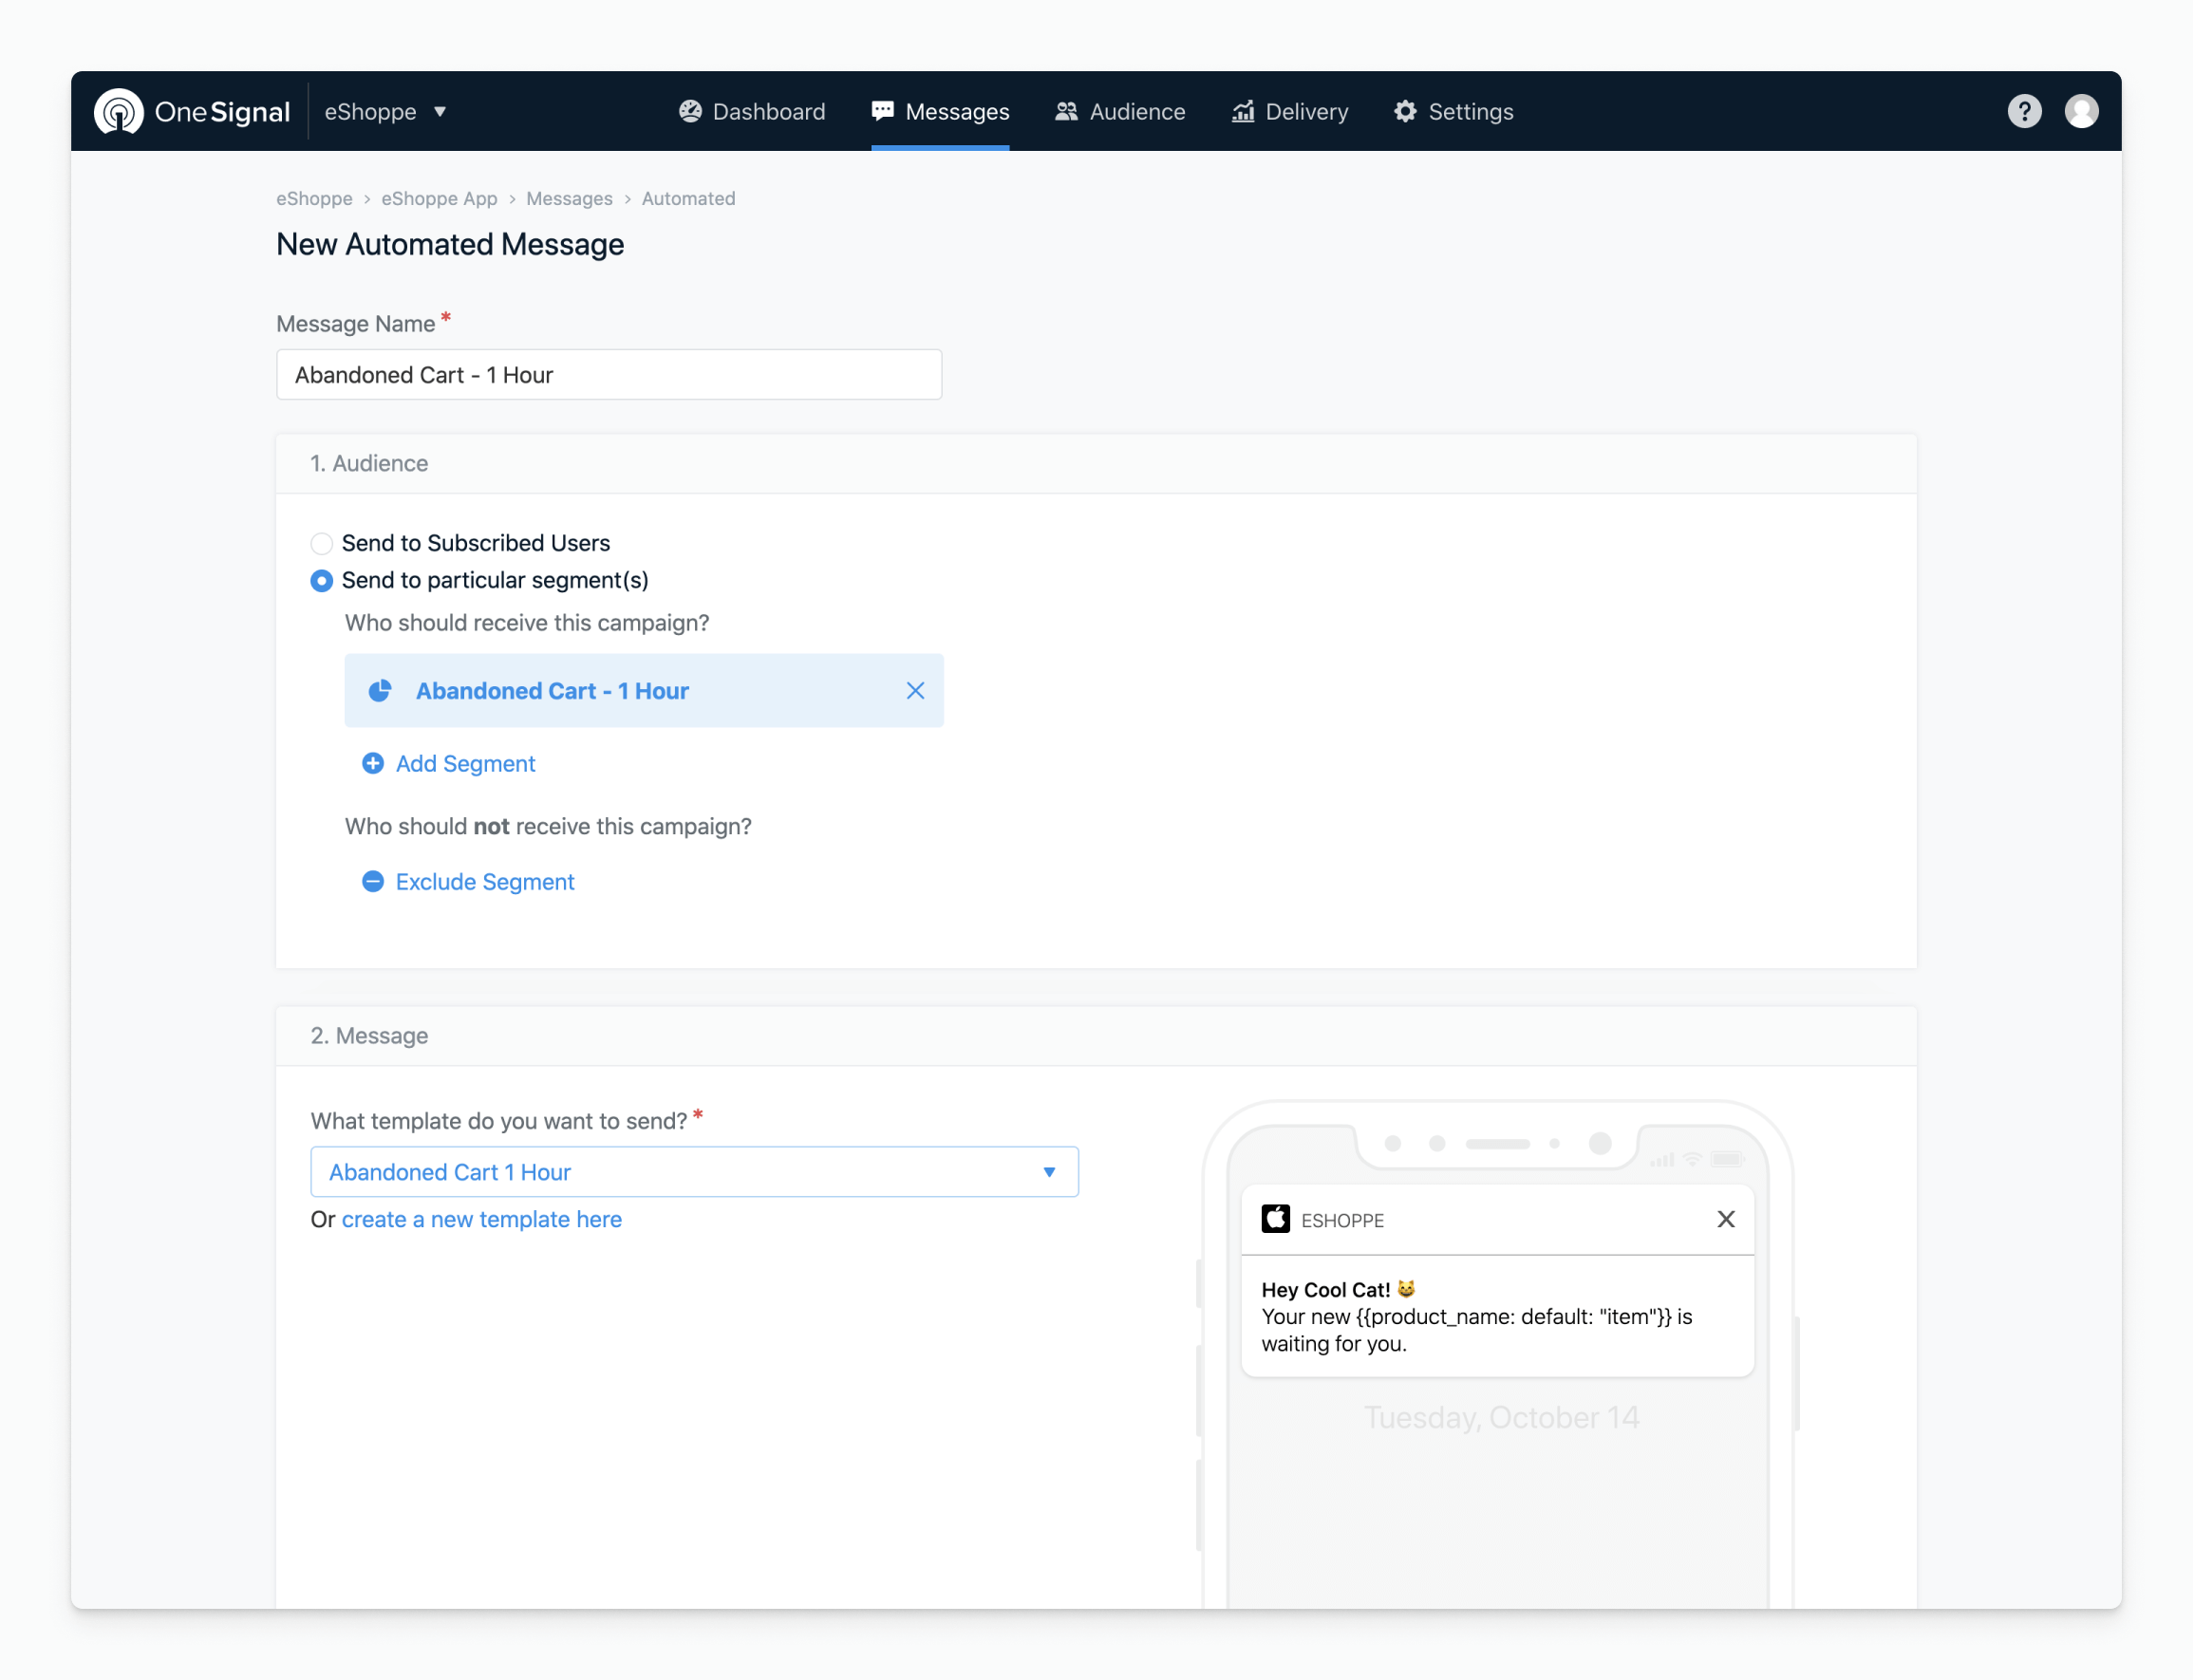
Event-based messaging also requires using more than one Data Tag in a given Segment. Let’s consider the example of an abandoned cart message. The goal of this type of message is to automatically re-engage customers who have added an item to their cart, but have yet to completed their purchase 24 hours later.
To create the foundation for an abandoned cart message, you’ll need to set up three tags which will be automatically assigned to a user’s device when they add an item to their cart:
{Cart_Update:Timestamp} Tracks when an item was first added to the cart so you can follow-up 24 hours later.
{Product_Name:productName} Indicates what item they’ve added to their cart so you can mention the product in the abandoned cart message.
{Product_Image:productImageURL} Automatically tags an image of the product in question, so that you can serve up that image in your message later.
You can then use these tags within a Segment to target specific users who have abandoned their cart and send them a notification letting them know what item they left behind. Abandoned cart messages can also be a compelling place to offer a discount to increase the likelihood of conversion.
To make sure your message accurately reflects changes to a user’s cart, it’s important that your tags are updated when a user removes an item from their cart and/or checks out (and not just when they add an item). You can automatically update the user’s tags by adding the same tags with an empty value to the "checkout" button and the "remove" button.
The tags would look something like this:
cart_update: "", product_name: "", product_image: "",
Since these events change in real-time, you will want to automate your messaging campaigns to trigger when a user meets all of the abandoned cart criteria (e.g. they added an item to their cart, and after 24 hours they did not remove the item or check out).
If you are looking to improve user acquisition, retention, and engagement, Data Tags and Segments should be a key part of your growth strategy. Creating even basic Data Tags will set the foundation for sending more personalized, relevant messages that users expect from their favorite brands.
Getting Started
As you start to build out different campaigns, Data Tags, and Segments, remember that there’s no shame in starting simple. Set up one tag to get the ball rolling, and edit/add to your targeting infrastructure as your needs evolve — your future self will thank you. Simply login to your OneSignal account to keep pace with your competition and unlock unlimited growth opportunities.
Need some support creating, formatting, applying, or troubleshooting your Data Tags? Check out our Frequently Asked Data Tag Questions wiki below.